The documentation section provides a comprehensive guide to using Solo to launch a Hiero Consensus Node network, including setup instructions, usage guides, and information for developers. It covers everything from installation to advanced features and troubleshooting.
This is the multi-page printable view of this section. Click here to print.
Documentation
The documentation section provides a comprehensive guide to using Solo to launch a Hiero Consensus Node network, including setup instructions, usage guides, and information for developers. It covers everything from installation to advanced features and troubleshooting.
- 1: Getting Started
- 2: Solo User Guide
- 3: Advanced Network Deployments
- 4: Solo CLI User Manual
- 5: Updated CLI Command Mappings
- 6: Solo CLI Commands
- 7: FAQ
- 8: Troubleshooting
- 9: Using Solo with Mirror Node
- 10: Using Solo with Hiero JavaScript SDK
- 11: Hiero Consensus Node Platform Developer
- 12: Hiero Consensus Node Execution Developer
- 13: Attach JVM Debugger and Retrieve Logs
- 14: Using Network Load Generator with Solo
- 15: Using Environment Variables
- 16: Solo CI Workflow
- 17:
1 - Getting Started
Getting started with Solo
Solo


![]()
![]()
An opinionated CLI tool to deploy and manage standalone test networks.
Releases
Solo releases are supported for one month after their release date. Upgrade to the latest version to benefit from new features and improvements. Every quarter a version is designated as LTS (Long-Term Support) and supported for three months.
Current Releases
| Solo Version | Node.js | Kind | Solo Chart | Hedera | Kubernetes | Kubectl | Helm | k9s | Docker Resources | Release Date | End of Support |
|---|---|---|---|---|---|---|---|---|---|---|---|
| 0.55.0 | >= 22.0.0 (lts/jod) | >= v0.29.0 | v0.60.2 | v0.68.7-rc.1 | >= v1.32.2 | >= v1.32.2 | v3.14.2 | >= v0.27.4 | Memory >= 12GB, CPU cores >= 6 | 2026-02-05 | 2026-03-05 |
| 0.54.0 (LTS) | >= 22.0.0 (lts/jod) | >= v0.29.0 | v0.59.0 | v0.68.6+ | >= v1.32.2 | >= v1.32.2 | v3.14.2 | >= v0.27.4 | Memory >= 12GB, CPU cores >= 6 | 2026-01-27 | 2026-04-27 |
| 0.53.0 | >= 22.0.0 (lts/jod) | >= v0.29.0 | v0.58.1 | v0.67.2+ | >= v1.32.2 | >= v1.27.3 | v3.14.2 | >= v0.27.4 | Memory >= 12GB, CPU cores >= 6 | 2026-01-15 | 2026-02-15 |
| 0.52.0 (LTS) | >= 22.0.0 (lts/jod) | >= v0.26.0 | v0.58.1 | v0.67.2+ | >= v1.27.3 | >= v1.27.3 | v3.14.2 | >= v0.27.4 | Memory >= 12GB, CPU cores >= 6 | 2025-12-11 | 2026-03-11 |
| 0.50.0 (LTS) | >= 22.0.0 (lts/jod) | >= v0.26.0 | v0.57.0 | v0.66.0+ | >= v1.27.3 | >= v1.27.3 | v3.14.2 | >= v0.27.4 | Memory >= 12GB, CPU cores >= 6 | 2025-11-13 | 2026-02-13 |
To see a list of legacy releases, please check the legacy versions documentation page.
Hardware Requirements
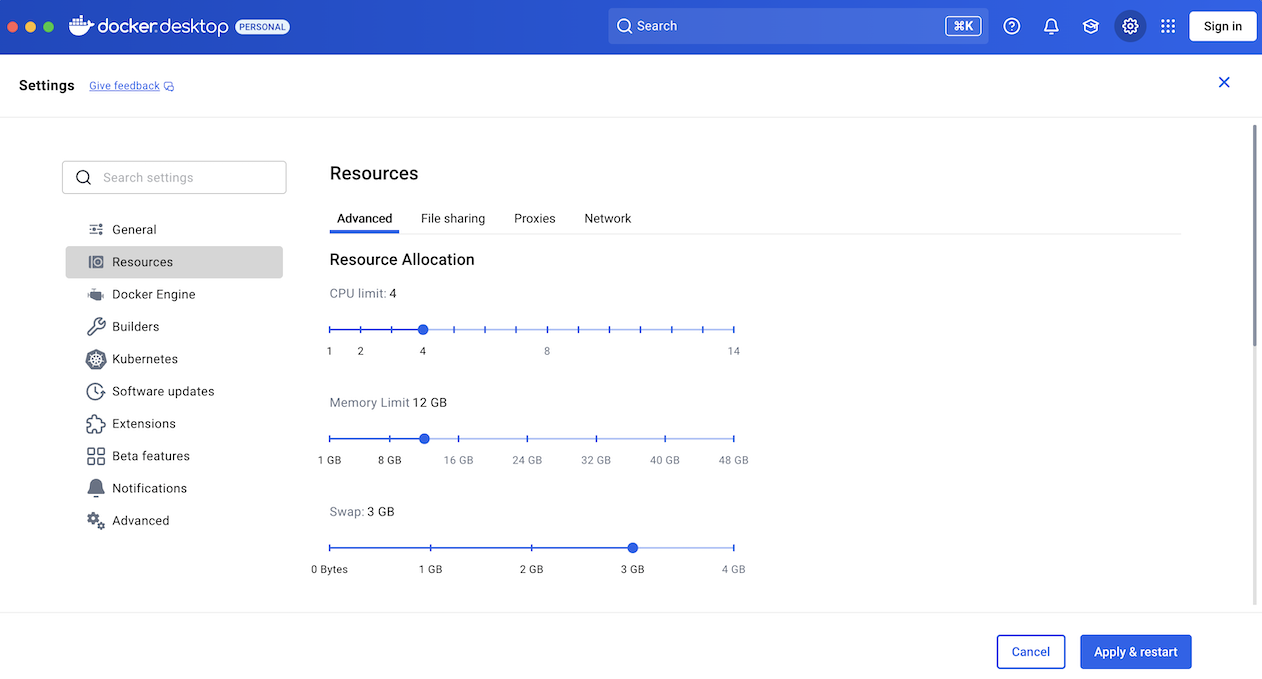
Docker Desktop (or Docker Engine / Podman on Linux) with at least 12GB of memory and 6 CPU cores.
Installation
Install Solo via Homebrew (macOS, Linux, WSL2):
brew install hiero-ledger/tools/solo
Or via npm (requires Node.js >= 22.0.0):
npm install -g @hashgraph/solo@latest
For detailed platform-specific instructions, see the Solo User Guide.
Documentation
If you have installed solo we recommend starting your docs journey at the one-shot network deployment command you can find here: solo docs)
Contributing
Contributions are welcome. Please see the contributing guide to see how you can get involved.
Code of Conduct
This project is governed by the Contributor Covenant Code of Conduct. By participating, you are expected to uphold this code of conduct.
License
2 - Solo User Guide
Learn how to set up your first Hiero test network using Solo. This step-by-step guide covers installation, deployment, and basic network operations.
Introduction
Welcome to the world of Hiero development! If you’re looking to build and test applications on the Hiero network but don’t want to spend HBAR on testnet or mainnet transactions, you’ve come to the right place. Solo is your gateway to running your own local Hiero test network, giving you complete control over your development environment.
Solo is an opinionated command-line interface (CLI) tool designed to deploy and manage standalone Hiero test networks. Think of it as your personal Hiero sandbox where you can experiment, test features, and develop applications without any external dependencies or costs.
By the end of this tutorial, you’ll have your own Hiero test network running locally, complete with consensus nodes, mirror nodes, and all the infrastructure needed to submit transactions and test your applications.
System Requirements
First, check that your computer meets these minimum specifications (for a single-node network):
- Memory: At least 12 GB (16 GB recommended for smoother performance)
- CPU: Minimum 6 cores (8 cores recommended)
- Storage: At least 20 GB of free disk space
- Operating System: macOS, Linux, or Windows with WSL2
Installation
Choose your platform below:
# 1. Install Homebrew (if not already installed)
/bin/bash -c "$(curl -fsSL https://raw.githubusercontent.com/Homebrew/install/HEAD/install.sh)"

# 2. Install Docker Desktop
# Download from: https://www.docker.com/products/docker-desktop
# Start Docker Desktop and allocate at least 12 GB of memory:
# Docker Desktop > Settings > Resources > Memory

# 3. Remove existing npm based installs
<!--lint ignore no-undefined-references-->
[[ "$(command -v npm >/dev/null 2>&1 && echo 0 || echo 1)" -eq 0 ]] && { npm uninstall -g @hashgraph/solo >/dev/null 2>&1 || /bin/true }

# 4. Install Solo (this installs all other dependencies automatically)
brew tap hiero-ledger/tools
brew update
brew install solo

# Verify the installation
solo --version
# 1. Install Homebrew for Linux
/bin/bash -c "$(curl -fsSL https://raw.githubusercontent.com/Homebrew/install/HEAD/install.sh)"
# Add Homebrew to your PATH
echo 'eval "$(/home/linuxbrew/.linuxbrew/bin/brew shellenv)"' >> ~/.bashrc
eval "$(/home/linuxbrew/.linuxbrew/bin/brew shellenv)"
# 2. Install Docker Engine
# For Ubuntu/Debian:
sudo apt-get update
sudo apt-get install -y docker.io
sudo systemctl enable docker
sudo systemctl start docker
sudo usermod -aG docker ${USER}
# Log out and back in for group changes to take effect
# 3. Install kubectl
sudo apt update && sudo apt install -y ca-certificates curl
ARCH="$(dpkg --print-architecture)"
curl -fsSLo kubectl "https://dl.k8s.io/release/$(curl -L -s https://dl.k8s.io/release/stable.txt)/bin/linux/${ARCH}/kubectl"
chmod +x kubectl
sudo mv kubectl /usr/local/bin/kubectl
# 4. Remove existing npm based installs
<!--lint ignore no-undefined-references-->
[[ "$(command -v npm >/dev/null 2>&1 && echo 0 || echo 1)" -eq 0 ]] && { npm uninstall -g @hashgraph/solo >/dev/null 2>&1 || /bin/true }
# 5. Install Solo (this installs all other dependencies automatically)
brew tap hiero-ledger/tools
brew update
brew install solo
# 6. Install Solo (this installs remaining dependencies automatically)
brew install hiero-ledger/tools/solo
# Verify the installation
solo --version# First, in Windows PowerShell (as Administrator):
# wsl --install Ubuntu
# Then reboot and open the Ubuntu terminal.
# All commands below run in your Ubuntu (WSL2) terminal.
# 1. Install Homebrew for Linux
/bin/bash -c "$(curl -fsSL https://raw.githubusercontent.com/Homebrew/install/HEAD/install.sh)"
# Add Homebrew to your PATH
echo 'eval "$(/home/linuxbrew/.linuxbrew/bin/brew shellenv)"' >> ~/.bashrc
eval "$(/home/linuxbrew/.linuxbrew/bin/brew shellenv)"
# 2. Install Docker Desktop for Windows
# Download from: https://www.docker.com/products/docker-desktop
# Enable WSL2 integration: Docker Desktop > Settings > Resources > WSL Integration
# Allocate at least 12 GB of memory: Docker Desktop > Settings > Resources
# 3. Install kubectl
sudo apt update && sudo apt install -y ca-certificates curl
ARCH="$(dpkg --print-architecture)"
curl -fsSLo kubectl "https://dl.k8s.io/release/$(curl -L -s https://dl.k8s.io/release/stable.txt)/bin/linux/${ARCH}/kubectl"
chmod +x kubectl
sudo mv kubectl /usr/local/bin/kubectl
# 4. Remove existing npm based installs
<!--lint ignore no-undefined-references-->
[[ "$(command -v npm >/dev/null 2>&1 && echo 0 || echo 1)" -eq 0 ]] && { npm uninstall -g @hashgraph/solo >/dev/null 2>&1 || /bin/true }
# 5. Install Solo (this installs all other dependencies automatically)
brew tap hiero-ledger/tools
brew update
brew install solo
# 6. Install Solo (this installs remaining dependencies automatically)
brew install hiero-ledger/tools/solo
# Verify the installation
solo --version
# IMPORTANT: Always run Solo commands from this WSL2 terminal.Alternative: Install via NPM (for contributors/advanced users)
If you need more control over dependencies or are contributing to Solo development:
# Requires Node.js >= 22.0.0 and Kind to be installed separately
npm install -g @hashgraph/solo
See the Development Guide for complete contributor setup instructions.
Troubleshooting Installation
⚠️ Having trouble? Try cleaning up first
If you’re experiencing issues installing or upgrading Solo (e.g., conflicts with a previous installation), you may need to clean up your environment first.
⚠️ Warning: The commands below will delete Solo-managed Kind clusters and remove your Solo home directory (
~/.solo).
# Delete only Solo-managed Kind clusters (names starting with "solo")
kind get clusters | grep '^solo' | while read cluster; do
  kind delete cluster -n "$cluster"
done

# Remove Solo configuration and cache
rm -rf ~/.solo
After cleaning up, retry the installation with brew install hiero-ledger/tools/solo.
Deploying Your Network
With Solo installed, deploying a complete Hiero test network takes just one command:
solo one-shot single deploy
That’s it! This single command automatically:
- Creates a local Kubernetes cluster
- Sets up all required configurations
- Deploys a consensus node
- Deploys a mirror node with explorer UI
- Deploys a JSON RPC relay
- Configures port-forwarding so you can access services immediately
- Generates cryptographic keys
- Creates test accounts
The deployment takes a few minutes. When complete, your network is ready to use.
What Gets Deployed
| Component | Description |
|---|---|
| Consensus Node | Hiero consensus node for processing transactions |
| Mirror Node | Stores and serves historical data |
| Explorer UI | Web interface for viewing accounts and transactions |
| JSON RPC Relay | Ethereum-compatible JSON RPC interface |
Multiple Node Deployment
For testing consensus scenarios (click to expand)
For testing consensus scenarios or multi-node behavior, you can deploy multiple consensus nodes by specifying the --num-consensus-nodes flag:
solo one-shot single deploy --num-consensus-nodes 3
This deploys 3 consensus nodes along with the same components as the single-node setup (mirror node, explorer, relay).
📝 Note: Multiple node deployments require more resources. Ensure you have at least 16 GB of memory and 8 CPU cores allocated to Docker.
When finished:
solo one-shot single destroy
Working with Your Network
Network Endpoints
After deployment, your network services are automatically available at:
| Service | Endpoint | Description |
|---|---|---|
| Explorer UI | http://localhost:8080 | Web UI for inspecting network |
| Consensus Node | localhost:50211 | gRPC endpoint for transactions |
| Mirror Node REST | http://localhost:5551 | REST API for queries |
| JSON RPC Relay | localhost:7546 | Ethereum-compatible JSON RPC |
Open http://localhost:8080 in your browser to explore your network.
Check Pod Status
To verify all components are running:
kubectl get pods -A | grep -v kube-system
💡 Tip: The Solo testing team recommends k9s for managing Kubernetes clusters. It provides a terminal-based UI that makes it easy to view pods, logs, and cluster status. Install it with
brew install k9sand runk9sto launch.
Managing Your Network
Stopping and Starting Nodes
First, find your deployment name (shown during deployment or in ~/.solo/cache/last-one-shot-deployment.txt):
cat ~/.solo/cache/last-one-shot-deployment.txt
Then use it in management commands:
# Stop all nodes
solo consensus node stop --deployment <deployment-name>

# Start nodes again
solo consensus node start --deployment <deployment-name>

# Restart nodes
solo consensus node restart --deployment <deployment-name>
Viewing Logs
Capture logs and diagnostic information:
solo deployment diagnostics all --deployment <deployment-name>
Logs are saved to ~/.solo/logs/. You can also use kubectl logs directly:
kubectl logs -n <namespace> <pod-name>
Updating the Network
To update nodes to a new Hiero version:
solo consensus network upgrade --deployment <deployment-name> --upgrade-version v0.66.0
Cleanup
Destroying Your Network
🚨 Important: Always destroy your network properly before deploying a new one!
Skipping this step is one of the most common causes of deployment failures. Solo stores state about your deployment, and deploying a new network without destroying the old one first leads to conflicts and errors.
To remove your Solo network:
solo one-shot single destroy
This command:
- Removes all deployed pods and services
- Cleans up the Kubernetes namespace
- Deletes the Kind cluster
- Updates Solo’s internal state
Always run destroy before deploying a new network.
A Note on Resource Usage
Solo deploys a fully functioning mirror node that stores the transaction history generated by your local test network. During active testing, the mirror node’s resource consumption will grow as it processes more transactions. If you notice increasing resource usage, destroying and redeploying the network with the commands above gives you a clean slate.
Full Reset
If solo one-shot single destroy fails or you need to recover from a corrupted state:
# Delete only Solo-managed Kind clusters (names starting with "solo")
kind get clusters | grep '^solo' | while read cluster; do
  kind delete cluster -n "$cluster"
done

# Remove Solo configuration
rm -rf ~/.solo
⚠️ Warning: Routinely deleting clusters between test runs is inefficient and unnecessary. Use
solo one-shot single destroyfor normal teardown. The full reset above should only be used when the standard destroy command fails. Avoid usingkind get clusterswithout thegrepfilter — that would delete every Kind cluster on your machine, including any unrelated to Solo.
For additional troubleshooting steps, see the Troubleshooting Guide.
Next Steps
Congratulations! You now have a working Hiero test network. Here’s what to explore next:
Using Solo with Hiero JavaScript SDK - Create accounts, topics, and submit transactions using the SDK.
Mirror Node Queries - Learn how to query the mirror node REST API at
http://localhost:5551.Advanced Network Deployments - Deploy networks with custom configurations using Falcon, manual step-by-step deployment, or add/delete nodes dynamically.
Examples - Explore example configurations for various deployment scenarios.
FAQ - Common questions and answers about Solo.
If you run into issues, check the Troubleshooting Guide for solutions to common problems.
3 - Advanced Network Deployments
Advanced deployment options for Solo networks including Falcon configuration, manual step-by-step deployment, Helm chart customization, and dynamic node management.
This guide covers advanced deployment scenarios for users who need more control over their Solo network configuration.
Prerequisites
Before using advanced deployment options, ensure you have completed the Solo User Guide and have:
- Solo installed (
solo --version) - Docker running with adequate resources
- kubectl configured
- A Kind cluster created
Set up your environment variables if not already done:
export SOLO_CLUSTER_NAME=solo
export SOLO_NAMESPACE=solo
export SOLO_CLUSTER_SETUP_NAMESPACE=solo-cluster
export SOLO_DEPLOYMENT=solo-deployment
Falcon Deployment
Falcon deployment provides fine-grained control over all network components through a YAML configuration file. This is ideal for CI/CD pipelines, automated testing, and complex deployment scenarios.
Basic Falcon Deployment
solo one-shot falcon deploy --values-file falcon-values.yaml
Example Configuration File
Create a file named falcon-values.yaml:
network:
  --deployment: "my-network"
  --release-tag: "v0.65.0"
  --node-aliases: "node1"

setup:
  --release-tag: "v0.65.0"
  --node-aliases: "node1"

consensusNode:
  --deployment: "my-network"
  --node-aliases: "node1"
  --force-port-forward: true

mirrorNode:
  --enable-ingress: true
  --pinger: true

explorerNode:
  --enable-ingress: true

relayNode:
  --node-aliases: "node1"
Multi-Node Falcon Configuration
For multiple consensus nodes:
network:
  --deployment: "my-multi-network"
  --release-tag: "v0.65.0"
  --node-aliases: "node1,node2,node3"

setup:
  --release-tag: "v0.65.0"
  --node-aliases: "node1,node2,node3"

consensusNode:
  --deployment: "my-multi-network"
  --node-aliases: "node1,node2,node3"
  --force-port-forward: true

mirrorNode:
  --enable-ingress: true
  --pinger: true

explorerNode:
  --enable-ingress: true

relayNode:
  --node-aliases: "node1"
Falcon with Block Node
Note: Block Node is experimental and requires at least 16 GB of memory allocated to Docker.
network:
  --deployment: "block-node-network"
  --release-tag: "v0.62.6"
  --node-aliases: "node1"

setup:
  --release-tag: "v0.62.6"
  --node-aliases: "node1"

consensusNode:
  --deployment: "block-node-network"
  --node-aliases: "node1"
  --force-port-forward: true

blockNode:
  --deployment: "block-node-network"
  --release-tag: "v0.62.6"

mirrorNode:
  --enable-ingress: true
  --pinger: true

explorerNode:
  --enable-ingress: true

relayNode:
  --node-aliases: "node1"
Tearing Down Falcon Deployment
solo one-shot falcon destroy
See the Falcon example for a complete configuration template.
Step-by-Step Manual Deployment
For maximum control, you can deploy each component individually. This is useful for debugging, custom configurations, or when you need to modify specific deployment steps.
1. Connect Cluster and Create Deployment
# Connect to the Kind cluster
solo cluster-ref config connect --cluster-ref kind-${SOLO_CLUSTER_NAME} --context kind-${SOLO_CLUSTER_NAME}

# Create a new deployment
solo deployment config create -n "${SOLO_NAMESPACE}" --deployment "${SOLO_DEPLOYMENT}"
Example output:
>> environment variable 'ONE_SHOT_WITH_BLOCK_NODE' exists, using its value

******************************* Solo *********************************************
Version			: 0.55.0
Kubernetes Context	: kind-solo
Kubernetes Cluster	: kind-solo
Current Command		: cluster-ref config connect --cluster-ref kind-solo --context kind-solo
**********************************************************************************
 Initialize
✔ Initialize
 Validating cluster ref:
✔ Validating cluster ref: kind-solo
 Test connection to cluster:
✔ Test connection to cluster: kind-solo
 Associate a context with a cluster reference:
✔ Associate a context with a cluster reference: kind-solo
solo-deployment_CREATE_OUTPUT
2. Add Cluster to Deployment
Specify the number of consensus nodes:
# For a single node
solo deployment cluster attach --deployment "${SOLO_DEPLOYMENT}" --cluster-ref kind-${SOLO_CLUSTER_NAME} --num-consensus-nodes 1

# For multiple nodes (e.g., 3 nodes)
# solo deployment cluster attach --deployment "${SOLO_DEPLOYMENT}" --cluster-ref kind-${SOLO_CLUSTER_NAME} --num-consensus-nodes 3
Example output:
solo-deployment_ADD_CLUSTER_OUTPUT
3. Generate Keys
solo keys consensus generate --gossip-keys --tls-keys --deployment "${SOLO_DEPLOYMENT}"
PEM key files are generated in ~/.solo/cache/keys/.
Example output:
>> environment variable 'ONE_SHOT_WITH_BLOCK_NODE' exists, using its value

******************************* Solo *********************************************
Version			: 0.55.0
Kubernetes Context	: kind-solo
Kubernetes Cluster	: kind-solo
Current Command		: keys consensus generate --gossip-keys --tls-keys --deployment solo-deployment
**********************************************************************************
 Initialize
✔ Initialize
 Generate gossip keys
 Backup old files
✔ Backup old files
 Gossip key for node: node1
✔ Gossip key for node: node1 [0.8s]
✔ Generate gossip keys [0.8s]
 Generate gRPC TLS Keys
 Backup old files
 TLS key for node: node1
✔ Backup old files
✔ TLS key for node: node1 [0.8s]
✔ Generate gRPC TLS Keys [0.8s]
 Finalize
✔ Finalize
4. Set Up Cluster with Shared Components
solo cluster-ref config setup -s "${SOLO_CLUSTER_SETUP_NAMESPACE}"
Example output:
>> environment variable 'ONE_SHOT_WITH_BLOCK_NODE' exists, using its value

******************************* Solo *********************************************
Version			: 0.55.0
Kubernetes Context	: kind-solo
Kubernetes Cluster	: kind-solo
Current Command		: cluster-ref config setup --cluster-setup-namespace solo-cluster
**********************************************************************************
 Check dependencies
 Check dependency: helm [OS: darwin, Release: 23.6.0, Arch: arm64]
✔ Check dependency: helm [OS: darwin, Release: 23.6.0, Arch: arm64]
✔ Check dependencies
 Setup chart manager
✔ Setup chart manager
 Initialize
✔ Initialize
 Install cluster charts
Skipping Grafana Agent chart installation
 Install pod-monitor-role ClusterRole
⏭️  ClusterRole pod-monitor-role already exists in context kind-solo, skipping
✔ Install pod-monitor-role ClusterRole
 Install MinIO Operator chart
✅ MinIO Operator chart installed successfully on context kind-solo
✔ Install MinIO Operator chart [0.6s]
✔ Install cluster charts [0.6s]
5. Deploy the Network
solo consensus network deploy --deployment "${SOLO_DEPLOYMENT}"
Example output:
>> environment variable 'ONE_SHOT_WITH_BLOCK_NODE' exists, using its value

******************************* Solo *********************************************
Version			: 0.55.0
Kubernetes Context	: kind-solo
Kubernetes Cluster	: kind-solo
Current Command		: consensus network deploy --deployment solo-deployment --release-tag v0.66.0
**********************************************************************************
 Check dependencies
 Check dependency: helm [OS: darwin, Release: 23.6.0, Arch: arm64]
 Check dependency: kubectl [OS: darwin, Release: 23.6.0, Arch: arm64]
✔ Check dependency: helm [OS: darwin, Release: 23.6.0, Arch: arm64]
✔ Check dependency: kubectl [OS: darwin, Release: 23.6.0, Arch: arm64]
✔ Check dependencies
 Setup chart manager
✔ Setup chart manager
 Initialize
 Acquire lock
✔ Acquire lock - lock acquired successfully, attempt: 1/10
✔ Initialize [0.1s]
 Copy gRPC TLS Certificates
 Copy gRPC TLS Certificates [SKIPPED: Copy gRPC TLS Certificates]
 Prepare staging directory
 Copy Gossip keys to staging
✔ Copy Gossip keys to staging
 Copy gRPC TLS keys to staging
✔ Copy gRPC TLS keys to staging
✔ Prepare staging directory
 Copy node keys to secrets
 Copy TLS keys
 Node: node1, cluster: kind-solo
 Copy Gossip keys
✔ Copy Gossip keys
✔ Node: node1, cluster: kind-solo
✔ Copy TLS keys
✔ Copy node keys to secrets
 Install monitoring CRDs
 Pod Logs CRDs
✔ Pod Logs CRDs
 Prometheus Operator CRDs
 - Installed prometheus-operator-crds chart, version: 24.0.2
✔ Prometheus Operator CRDs [2s]
✔ Install monitoring CRDs [2s]
 Install chart 'solo-deployment'
 - Installed solo-deployment chart, version: 0.60.2
✔ Install chart 'solo-deployment' [2s]
 Check for load balancer
 Check for load balancer [SKIPPED: Check for load balancer]
 Redeploy chart with external IP address config
 Redeploy chart with external IP address config [SKIPPED: Redeploy chart with external IP address config]
 Check node pods are running
 Check Node: node1, Cluster: kind-solo
✔ Check Node: node1, Cluster: kind-solo [38s]
✔ Check node pods are running [38s]
 Check proxy pods are running
 Check HAProxy for: node1, cluster: kind-solo
 Check Envoy Proxy for: node1, cluster: kind-solo
✔ Check HAProxy for: node1, cluster: kind-solo
✔ Check Envoy Proxy for: node1, cluster: kind-solo
✔ Check proxy pods are running
 Check auxiliary pods are ready
 Check MinIO
✔ Check MinIO
✔ Check auxiliary pods are ready
 Add node and proxies to remote config
✔ Add node and proxies to remote config
 Copy block-nodes.json
✔ Copy block-nodes.json [1s]
6. Set Up Consensus Nodes
export CONSENSUS_NODE_VERSION=v0.66.0
solo consensus node setup --deployment "${SOLO_DEPLOYMENT}" --release-tag "${CONSENSUS_NODE_VERSION}"
Example output:
>> environment variable 'ONE_SHOT_WITH_BLOCK_NODE' exists, using its value

******************************* Solo *********************************************
Version			: 0.55.0
Kubernetes Context	: kind-solo
Kubernetes Cluster	: kind-solo
Current Command		: consensus node setup --deployment solo-deployment --release-tag v0.66.0
**********************************************************************************
 Load configuration
✔ Load configuration [0.1s]
 Initialize
✔ Initialize [0.1s]
 Validate nodes states
 Validating state for node node1
✔ Validating state for node node1 - valid state: requested
✔ Validate nodes states
 Identify network pods
 Check network pod: node1
✔ Check network pod: node1
✔ Identify network pods
 Fetch platform software into network nodes
 Update node: node1 [ platformVersion = v0.66.0, context = kind-solo ]
✔ Update node: node1 [ platformVersion = v0.66.0, context = kind-solo ] [4s]
✔ Fetch platform software into network nodes [4s]
 Setup network nodes
 Node: node1
 Copy configuration files
✔ Copy configuration files [0.3s]
 Set file permissions
✔ Set file permissions [0.5s]
✔ Node: node1 [0.8s]
✔ Setup network nodes [0.9s]
 setup network node folders
✔ setup network node folders [0.1s]
 Change node state to configured in remote config
✔ Change node state to configured in remote config
7. Start Consensus Nodes
solo consensus node start --deployment "${SOLO_DEPLOYMENT}"
Example output:
>> environment variable 'ONE_SHOT_WITH_BLOCK_NODE' exists, using its value

******************************* Solo *********************************************
Version			: 0.55.0
Kubernetes Context	: kind-solo
Kubernetes Cluster	: kind-solo
Current Command		: consensus node start --deployment solo-deployment
**********************************************************************************
 Check dependencies
 Check dependency: kubectl [OS: darwin, Release: 23.6.0, Arch: arm64]
✔ Check dependency: kubectl [OS: darwin, Release: 23.6.0, Arch: arm64]
✔ Check dependencies
 Load configuration
✔ Load configuration [0.1s]
 Initialize
✔ Initialize [0.1s]
 Validate nodes states
 Validating state for node node1
✔ Validating state for node node1 - valid state: configured
✔ Validate nodes states
 Identify existing network nodes
 Check network pod: node1
✔ Check network pod: node1
✔ Identify existing network nodes
 Upload state files network nodes
 Upload state files network nodes [SKIPPED: Upload state files network nodes]
 Starting nodes
 Start node: node1
✔ Start node: node1 [0.1s]
✔ Starting nodes [0.1s]
 Enable port forwarding for debug port and/or GRPC port
Using requested port 50211
✔ Enable port forwarding for debug port and/or GRPC port
 Check all nodes are ACTIVE
 Check network pod: node1
✔ Check network pod: node1  - status ACTIVE, attempt: 15/300 [19s]
✔ Check all nodes are ACTIVE [19s]
 Check node proxies are ACTIVE
 Check proxy for node: node1
✔ Check proxy for node: node1 [8s]
✔ Check node proxies are ACTIVE [8s]
 set gRPC Web endpoint
Using requested port 30212
✔ set gRPC Web endpoint [3s]
 Change node state to started in remote config
✔ Change node state to started in remote config
 Add node stakes
 Adding stake for node: node1
✔ Adding stake for node: node1 [4s]
✔ Add node stakes [4s]
Stopping port-forwarder for port [30212]
8. Deploy Mirror Node
solo mirror node add --deployment "${SOLO_DEPLOYMENT}" --cluster-ref kind-${SOLO_CLUSTER_NAME} --enable-ingress --pinger
The --pinger flag ensures record files are imported regularly.
Example output:
>> environment variable 'ONE_SHOT_WITH_BLOCK_NODE' exists, using its value

******************************* Solo *********************************************
Version			: 0.55.0
Kubernetes Context	: kind-solo
Kubernetes Cluster	: kind-solo
Current Command		: mirror node add --deployment solo-deployment --cluster-ref kind-solo --enable-ingress --quiet-mode
**********************************************************************************
 Check dependencies
 Check dependency: helm [OS: darwin, Release: 23.6.0, Arch: arm64]
 Check dependency: kubectl [OS: darwin, Release: 23.6.0, Arch: arm64]
✔ Check dependency: helm [OS: darwin, Release: 23.6.0, Arch: arm64]
✔ Check dependency: kubectl [OS: darwin, Release: 23.6.0, Arch: arm64]
✔ Check dependencies
 Setup chart manager
✔ Setup chart manager
 Initialize
Using requested port 30212
 Acquire lock
✔ Acquire lock - lock acquired successfully, attempt: 1/10 [0.1s]
✔ Initialize [1s]
 Enable mirror-node
 Prepare address book
✔ Prepare address book [0.2s]
 Install mirror ingress controller
 - Installed haproxy-ingress-1 chart, version: 0.14.5
✔ Install mirror ingress controller [1s]
 Deploy mirror-node
 - Installed mirror chart, version: v0.146.0
✔ Deploy mirror-node [2s]
✔ Enable mirror-node [3s]
 Check pods are ready
 Check Postgres DB
 Check REST API
 Check GRPC
 Check Monitor
 Check Web3
 Check Importer
✔ Check Postgres DB [1m41s]
✔ Check Web3 [1m51s]
✔ Check GRPC [2m3s]
✔ Check Monitor [2m5s]
✔ Check REST API [2m34s]
✔ Check Importer [3m10s]
✔ Check pods are ready [3m10s]
 Seed DB data
 Insert data in public.file_data
✔ Insert data in public.file_data [0.6s]
✔ Seed DB data [0.6s]
 Add mirror node to remote config
✔ Add mirror node to remote config
 Enable port forwarding for mirror ingress controller
Using requested port 8081
✔ Enable port forwarding for mirror ingress controller
Stopping port-forwarder for port [30212]
9. Deploy Explorer
solo explorer node add --deployment "${SOLO_DEPLOYMENT}" --cluster-ref kind-${SOLO_CLUSTER_NAME}
Example output:
>> environment variable 'ONE_SHOT_WITH_BLOCK_NODE' exists, using its value

******************************* Solo *********************************************
Version			: 0.55.0
Kubernetes Context	: kind-solo
Kubernetes Cluster	: kind-solo
Current Command		: explorer node add --deployment solo-deployment --cluster-ref kind-solo --quiet-mode
**********************************************************************************
 Check dependencies
 Check dependency: helm [OS: darwin, Release: 23.6.0, Arch: arm64]
 Check dependency: kubectl [OS: darwin, Release: 23.6.0, Arch: arm64]
✔ Check dependency: kubectl [OS: darwin, Release: 23.6.0, Arch: arm64]
✔ Check dependency: helm [OS: darwin, Release: 23.6.0, Arch: arm64]
✔ Check dependencies
 Setup chart manager
✔ Setup chart manager
 Initialize
 Acquire lock
✔ Acquire lock - lock acquired successfully, attempt: 1/10
✔ Initialize [0.3s]
 Load remote config
✔ Load remote config [0.2s]
 Install cert manager
 Install cert manager [SKIPPED: Install cert manager]
 Install explorer
 - Installed hiero-explorer-1 chart, version: 26.0.0
✔ Install explorer [1s]
 Install explorer ingress controller
 Install explorer ingress controller [SKIPPED: Install explorer ingress controller]
 Check explorer pod is ready
✔ Check explorer pod is ready [8s]
 Check haproxy ingress controller pod is ready
 Check haproxy ingress controller pod is ready [SKIPPED: Check haproxy ingress controller pod is ready]
 Add explorer to remote config
✔ Add explorer to remote config
 Enable port forwarding for explorer
No port forward config found for Explorer
Using requested port 8080
✔ Enable port forwarding for explorer [0.1s]
10. Deploy JSON RPC Relay
solo relay node add -i node1 --deployment "${SOLO_DEPLOYMENT}"
Example output:
>> environment variable 'ONE_SHOT_WITH_BLOCK_NODE' exists, using its value

******************************* Solo *********************************************
Version			: 0.55.0
Kubernetes Context	: kind-solo
Kubernetes Cluster	: kind-solo
Current Command		: relay node add --node-aliases node1 --deployment solo-deployment --cluster-ref kind-solo
**********************************************************************************
 Check dependencies
 Check dependency: helm [OS: darwin, Release: 23.6.0, Arch: arm64]
 Check dependency: kubectl [OS: darwin, Release: 23.6.0, Arch: arm64]
✔ Check dependency: helm [OS: darwin, Release: 23.6.0, Arch: arm64]
✔ Check dependency: kubectl [OS: darwin, Release: 23.6.0, Arch: arm64]
✔ Check dependencies
 Setup chart manager
✔ Setup chart manager
 Initialize
 Acquire lock
✔ Acquire lock - lock acquired successfully, attempt: 1/10
✔ Initialize [0.4s]
 Check chart is installed
✔ Check chart is installed [0.1s]
 Prepare chart values
Using requested port 30212
✔ Prepare chart values [1s]
 Deploy JSON RPC Relay
 - Installed relay-1 chart, version: 0.73.0
✔ Deploy JSON RPC Relay [40s]
 Check relay is running
✔ Check relay is running
 Check relay is ready
✔ Check relay is ready
 Add relay component in remote config
✔ Add relay component in remote config
 Enable port forwarding for relay node
Using requested port 7546
✔ Enable port forwarding for relay node [0.1s]
Stopping port-forwarder for port [30212]
Deploying Block Node (Experimental)
Warning: Block Node requires at least 16 GB of memory and Consensus Node version v0.62.3 or higher.
Block Node must be deployed before the network:
# Deploy Block Node first
solo block node add --deployment "${SOLO_DEPLOYMENT}" --cluster-ref kind-"${SOLO_CLUSTER_NAME}" --release-tag v0.62.6

# Then deploy the network with the matching version
solo consensus network deploy --deployment "${SOLO_DEPLOYMENT}"
solo consensus node setup --deployment "${SOLO_DEPLOYMENT}" --release-tag v0.62.6
solo consensus node start --deployment "${SOLO_DEPLOYMENT}"
Example output:
>> environment variable 'ONE_SHOT_WITH_BLOCK_NODE' exists, using its value

******************************* Solo *********************************************
Version			: 0.55.0
Kubernetes Context	: kind-solo
Kubernetes Cluster	: kind-solo
Current Command		: block node add --deployment solo-deployment --cluster-ref kind-solo --release-tag v0.66.0
**********************************************************************************
 Check dependencies
 Check dependency: helm [OS: darwin, Release: 23.6.0, Arch: arm64]
 Check dependency: kubectl [OS: darwin, Release: 23.6.0, Arch: arm64]
✔ Check dependency: helm [OS: darwin, Release: 23.6.0, Arch: arm64]
✔ Check dependency: kubectl [OS: darwin, Release: 23.6.0, Arch: arm64]
✔ Check dependencies
 Setup chart manager
✔ Setup chart manager
 Initialize
 Acquire lock
✔ Acquire lock - lock acquired successfully, attempt: 1/10
✔ Initialize
 Prepare release name and block node name
✔ Prepare release name and block node name
 Prepare chart values
✔ Prepare chart values
 Deploy block node
 - Installed block-node-1 chart, version: 0.26.2
✔ Deploy block node [1s]
 Check block node pod is running
✔ Check block node pod is running [30s]
 Check software
✔ Check software
 Check block node pod is ready
✔ Check block node pod is ready [41s]
 Check block node readiness
✔ Check block node readiness - [1/100] success [0.1s]
 Add block node component in remote config
✔ Add block node component in remote config
 Update consensus nodes
 Update consensus nodes in remote config
✔ Update consensus nodes in remote config
✔ Update consensus nodes
To destroy Block Node (must be done before network destruction):
solo block node destroy --deployment "${SOLO_DEPLOYMENT}" --cluster-ref kind-${SOLO_CLUSTER_NAME}
Connecting to a Remote Cluster
Solo can deploy to any Kubernetes cluster, not just local Kind clusters.
Setting Up Remote Cluster Connection
# View available contexts
kubectl config get-contexts

# Switch to your remote cluster context
kubectl config use-context <context-name>

# Connect Solo to the remote cluster
solo cluster-ref config connect --cluster-ref <cluster-ref-name> --context <context-name>
Remote Cluster Requirements
- Kubernetes 1.24 or higher
- Sufficient resources for network components
- Network access to pull container images
- Storage class available for persistent volumes
Adding Nodes to an Existing Network
You can dynamically add new consensus nodes to a running network.
Quick Add (When Available)
# TODO: solo consensus node add (coming soon)
Step-by-Step Node Addition
For precise control over the node addition process:
# Prepare the new node
solo consensus dev-node-add prepare \
  --gossip-keys true \
  --tls-keys true \
  --deployment "${SOLO_DEPLOYMENT}" \
  --pvcs true \
  --admin-key <admin-key> \
  --node-alias node2 \
  --output-dir context

# Submit the transaction to add the node
solo consensus dev-node-add submit-transaction \
  --deployment "${SOLO_DEPLOYMENT}" \
  --input-dir context

# Execute the node addition
solo consensus dev-node-add execute \
  --deployment "${SOLO_DEPLOYMENT}" \
  --input-dir context
See the node-create-transaction example for a complete walkthrough.
Deleting Nodes from a Network
You can dynamically remove consensus nodes from a running network.
Quick Delete (When Available)
# TODO: solo consensus node destroy (coming soon)
Step-by-Step Node Deletion
For precise control over the node deletion process:
# Prepare the node for deletion
solo consensus dev-node-delete prepare \
  --deployment "${SOLO_DEPLOYMENT}" \
  --node-alias node2 \
  --output-dir context

# Submit the transaction to delete the node
solo consensus dev-node-delete submit-transaction \
  --deployment "${SOLO_DEPLOYMENT}" \
  --input-dir context

# Execute the node deletion
solo consensus dev-node-delete execute \
  --deployment "${SOLO_DEPLOYMENT}" \
  --input-dir context
See the node-delete-transaction example for a complete walkthrough.
Step-by-Step Node Update
For testing the update process or granular control:
# Prepare the update
solo consensus dev-node-update prepare \
  --deployment "${SOLO_DEPLOYMENT}" \
  --node-alias node1 \
  --release-tag v0.66.0 \
  --output-dir context

# Submit the update transaction
solo consensus dev-node-update submit-transaction \
  --deployment "${SOLO_DEPLOYMENT}" \
  --input-dir context

# Execute the update
solo consensus dev-node-update execute \
  --deployment "${SOLO_DEPLOYMENT}" \
  --input-dir context
See the node-update-transaction example for a complete walkthrough.
Complete Cleanup for Manual Deployments
When using manual deployment, clean up in reverse order:
# 1. Destroy relay node
solo relay node destroy -i node1 --deployment "${SOLO_DEPLOYMENT}" --cluster-ref kind-${SOLO_CLUSTER_NAME}
Example output:
>> environment variable 'ONE_SHOT_WITH_BLOCK_NODE' exists, using its value

******************************* Solo *********************************************
Version			: 0.55.0
Kubernetes Context	: kind-solo
Kubernetes Cluster	: kind-solo
Current Command		: relay node destroy --node-aliases node1 --deployment solo-deployment --cluster-ref kind-solo
**********************************************************************************
 Check dependencies
 Check dependency: helm [OS: darwin, Release: 23.6.0, Arch: arm64]
✔ Check dependency: helm [OS: darwin, Release: 23.6.0, Arch: arm64]
✔ Check dependencies
 Setup chart manager
✔ Setup chart manager [0.1s]
 Initialize
 Acquire lock
✔ Acquire lock - lock acquired successfully, attempt: 1/10
✔ Initialize [0.6s]
 Destroy JSON RPC Relay

 *** Destroyed Relays ***
-------------------------------------------------------------------------------
 - block-node-1 [block-node-server-0.26.2]
 - haproxy-ingress-1 [haproxy-ingress-0.14.5]
 - hiero-explorer-1 [hiero-explorer-chart-26.0.0]
 - mirror-1 [hedera-mirror-0.146.0]
 - prometheus-operator-crds [prometheus-operator-crds-24.0.2]
 - solo-deployment [solo-deployment-0.60.2]


✔ Destroy JSON RPC Relay [0.5s]
 Remove relay component from remote config
✔ Remove relay component from remote config
# 2. Destroy mirror node
solo mirror node destroy --deployment "${SOLO_DEPLOYMENT}" --force
Example output:
>> environment variable 'ONE_SHOT_WITH_BLOCK_NODE' exists, using its value

******************************* Solo *********************************************
Version			: 0.55.0
Kubernetes Context	: kind-solo
Kubernetes Cluster	: kind-solo
Current Command		: mirror node destroy --deployment solo-deployment --quiet-mode
**********************************************************************************
 Check dependencies
 Check dependency: helm [OS: darwin, Release: 23.6.0, Arch: arm64]
✔ Check dependency: helm [OS: darwin, Release: 23.6.0, Arch: arm64]
✔ Check dependencies
 Setup chart manager
✔ Setup chart manager
 Initialize
Using requested port 30212
 Acquire lock
✔ Acquire lock - lock acquired successfully, attempt: 1/10
✔ Initialize [1s]
 Destroy mirror-node
✔ Destroy mirror-node [0.7s]
 Delete PVCs
✔ Delete PVCs
 Uninstall mirror ingress controller
✔ Uninstall mirror ingress controller [0.3s]
 Remove mirror node from remote config
✔ Remove mirror node from remote config
Stopping port-forwarder for port [30212]
# 3. Destroy explorer node
solo explorer node destroy --deployment "${SOLO_DEPLOYMENT}" --force
Example output:
>> environment variable 'ONE_SHOT_WITH_BLOCK_NODE' exists, using its value

******************************* Solo *********************************************
Version			: 0.55.0
Kubernetes Context	: kind-solo
Kubernetes Cluster	: kind-solo
Current Command		: explorer node destroy --deployment solo-deployment --quiet-mode
**********************************************************************************
 Check dependencies
 Check dependency: helm [OS: darwin, Release: 23.6.0, Arch: arm64]
✔ Check dependency: helm [OS: darwin, Release: 23.6.0, Arch: arm64]
✔ Check dependencies
 Setup chart manager
✔ Setup chart manager [0.1s]
 Initialize
 Acquire lock
✔ Acquire lock - lock acquired successfully, attempt: 1/10
✔ Initialize [0.5s]
 Load remote config
✔ Load remote config [0.1s]
 Destroy explorer
✔ Destroy explorer [0.2s]
 Uninstall explorer ingress controller
✔ Uninstall explorer ingress controller [0.1s]
 Remove explorer from remote config
✔ Remove explorer from remote config
# 4. Destroy block node (if deployed) - BEFORE network destruction
solo block node destroy --deployment "${SOLO_DEPLOYMENT}" --cluster-ref kind-${SOLO_CLUSTER_NAME}
Example output:
>> environment variable 'ONE_SHOT_WITH_BLOCK_NODE' exists, using its value

******************************* Solo *********************************************
Version			: 0.55.0
Kubernetes Context	: kind-solo
Kubernetes Cluster	: kind-solo
Current Command		: block node destroy --deployment solo-deployment --cluster-ref kind-solo
**********************************************************************************
 Check dependencies
 Check dependency: helm [OS: darwin, Release: 23.6.0, Arch: arm64]
 Check dependency: kubectl [OS: darwin, Release: 23.6.0, Arch: arm64]
✔ Check dependency: helm [OS: darwin, Release: 23.6.0, Arch: arm64]
✔ Check dependency: kubectl [OS: darwin, Release: 23.6.0, Arch: arm64]
✔ Check dependencies
 Setup chart manager
✔ Setup chart manager [0.1s]
 Initialize
 Acquire lock
✔ Acquire lock - lock acquired successfully, attempt: 1/10
✔ Initialize [0.4s]
 Destroy block node
✔ Destroy block node [0.3s]
 Disable block node component in remote config
✔ Disable block node component in remote config
 Rebuild 'block.nodes.json' for consensus nodes
✔ Rebuild 'block.nodes.json' for consensus nodes [0.9s]
# 5. Destroy the network
solo consensus network destroy --deployment "${SOLO_DEPLOYMENT}" --force
Example output:
>> environment variable 'ONE_SHOT_WITH_BLOCK_NODE' exists, using its value

******************************* Solo *********************************************
Version			: 0.55.0
Kubernetes Context	: kind-solo
Kubernetes Cluster	: kind-solo
Current Command		: consensus network destroy --deployment solo-deployment --quiet-mode
**********************************************************************************
 Check dependencies
 Check dependency: helm [OS: darwin, Release: 23.6.0, Arch: arm64]
 Check dependency: kubectl [OS: darwin, Release: 23.6.0, Arch: arm64]
✔ Check dependency: helm [OS: darwin, Release: 23.6.0, Arch: arm64]
✔ Check dependency: kubectl [OS: darwin, Release: 23.6.0, Arch: arm64]
✔ Check dependencies
 Setup chart manager
✔ Setup chart manager
 Initialize
 Acquire lock
✔ Acquire lock - lock acquired successfully, attempt: 1/10
✔ Initialize
 Running sub-tasks to destroy network
✔ Deleting the RemoteConfig configmap in namespace solo [0.4s]
Additional Examples
Explore more deployment scenarios in the Examples section:
4 - Solo CLI User Manual
Solo CLI is a command line interface for the Hiero Consensus Node network. It allows users to interact with the network, manage accounts, and perform various operations.
Solo Command Line User Manual
Solo has a series of commands to use, and some commands have subcommands. User can get help information by running with the following methods:
solo --help will return the help information for the solo command to show which commands
are available.
Version Information
Check the Solo version using:
solo --version
For machine-readable output formats (Kubernetes ecosystem standard), use the --output or -o flag:
solo --version -o json    # JSON format: {"version": "0.46.1"}
solo --version -o yaml    # YAML format: version: 0.46.1
solo --version -o wide    # Plain text: 0.46.1
The --output flag can also be used with other Solo commands to suppress banners and produce machine-readable output, making it ideal for scripts and CI/CD pipelines.
solo command --help will return the help information for the specific command to show which options
solo ledger account --help

Manage Hedera accounts in solo network

Commands:
  system init     Initialize system accounts with new keys
  account create   Creates a new account with a new key and stores the key in th
                   e Kubernetes secrets, if you supply no key one will be genera
                   ted for you, otherwise you may supply either a ECDSA or ED255
                   19 private key
  account update   Updates an existing account with the provided info, if you wa
                   nt to update the private key, you can supply either ECDSA or
                   ED25519 but not both

  account get      Gets the account info including the current amount of HBAR

Options:
      --dev                 Enable developer mode                      [boolean]
      --force-port-forward  Force port forward to access the network services
                                                                       [boolean]
  -h, --help                Show help                                  [boolean]
  -v, --version             Show version number                        [boolean]
solo command subcommand --help will return the help information for the specific subcommand to show which options
solo ledger account create --help

Creates a new account with a new key and stores the key in the Kubernetes secret
s, if you supply no key one will be generated for you, otherwise you may supply
either a ECDSA or ED25519 private key

Options:
      --dev                  Enable developer mode                     [boolean]
      --force-port-forward   Force port forward to access the network services
                                                                       [boolean]
      --hbar-amount          Amount of HBAR to add                      [number]
      --create-amount        Amount of new account to create            [number]
      --ecdsa-private-key    ECDSA private key for the Hedera account   [string]
  -d, --deployment           The name the user will reference locally to link to
                              a deployment                              [string]
      --ed25519-private-key  ED25519 private key for the Hedera account [string]
      --generate-ecdsa-key   Generate ECDSA private key for the Hedera account
                                                                       [boolean]
      --set-alias            Sets the alias for the Hedera account when it is cr
                             eated, requires --ecdsa-private-key       [boolean]
  -c, --cluster-ref          The cluster reference that will be used for referen
                             cing the Kubernetes cluster and stored in the local
                              and remote configuration for the deployment.  For
                             commands that take multiple clusters they can be se
                             parated by commas.                         [string]
  -h, --help                 Show help                                 [boolean]
  -v, --version              Show version number                       [boolean]
For more information see: Solo CLI Commands
5 - Updated CLI Command Mappings
A mapping of CLI commands from < v0.44.0 to >= v0.44.0
Updated CLI Command Mappings
The following tables provide a complete mapping of previous (< v0.44.0) CLI commands to their updated three-level structure. Entries marked as No changes retain their original form.
Init
| Old Command | New Command |
|---|---|
| init | No changes |
Block node
| Old Command | New Command |
|---|---|
| block node add | No changes |
| block node destroy | No changes |
| block node upgrade | No changes |
Account
| Old Command | New Command |
|---|---|
| account init | ledger system init |
| account update | ledger account update |
| account create | ledger account create |
| account get | ledger account info |
One Shot
| Old Command | New Command |
|---|---|
| quick-start single deploy | one-shot single deploy |
| quick-start single destroy | one-shot single destroy |
Cluster Reference
| Old Command | New Command |
|---|---|
| cluster-ref connect | cluster-ref config connect |
| cluster-ref disconnect | cluster-ref config disconnect |
| cluster-ref list | cluster-ref config list |
| cluster-ref info | cluster-ref config info |
| cluster-ref setup | cluster-ref config setup |
| cluster-ref reset | cluster-ref config reset |
Deployment
| Old Command | New Command |
|---|---|
| deployment add-cluster | deployment cluster attach |
| deployment list | deployment config list |
| deployment create | deployment config create |
| deployment delete | deployment config destroy |
Explorer
| Old Command | New Command |
|---|---|
| explorer deploy | explorer node add |
| explorer destroy | explorer node destroy |
Mirror Node
| Old Command | New Command |
|---|---|
| mirror-node deploy | mirror node add |
| mirror-node destroy | mirror node destroy |
Relay
| Old Command | New Command |
|---|---|
| relay deploy | relay node add |
| relay destroy | relay node destroy |
Network
| Old Command | New Command |
|---|---|
| network deploy | consensus network deploy |
| network destroy | consensus network destroy |
Node
| Old Command | New Command |
|---|---|
| node keys | keys consensus generate |
| node freeze | consensus network freeze |
| node upgrade | consensus network upgrade |
| node setup | consensus node setup |
| node start | consensus node start |
| node stop | consensus node stop |
| node upgrade | consensus node upgrade |
| node restart | consensus node restart |
| node refresh | consensus node refresh |
| node add | consensus node add |
| node update | consensus node update |
| node delete | consensus node destroy |
| node add-prepare | consensus dev-node-add prepare |
| node add-submit-transaction | consensus dev-node-add submit-transaction |
| node add-execute | consensus dev-node-add execute |
| node update-prepare | consensus dev-node-update prepare |
| node update-submit-transaction | consensus dev-node-update submit-transaction |
| node update-execute | consensus dev-node-update execute |
| node upgrade-prepare | consensus dev-node-upgrade prepare |
| node upgrade-submit-transaction | consensus dev-node-upgrade submit-transaction |
| node upgrade-execute | consensus dev-node-upgrade execute |
| node delete-prepare | consensus dev-node-delete prepare |
| node delete-submit-transaction | consensus dev-node-delete submit-transaction |
| node delete-execute | consensus dev-node-delete execute |
| node prepare-upgrade | consensus dev-freeze prepare-upgrade |
| node freeze-upgrade | consensus dev-freeze freeze-upgrade |
| node download-generated-files | consensus diagnostic configs |
| node logs | deployment diagnostics logs |
| node states | consensus state download |
6 - Solo CLI Commands
This document provides a comprehensive reference for the Solo CLI commands, including their options and usage.
Solo Command Reference
Table of Contents
Root Help Output
>> environment variable 'ONE_SHOT_WITH_BLOCK_NODE' exists, using its value
Usage:
  solo <command> [options]

Commands:
  init         Initialize local environment
  config       Backup and restore component configurations for Solo deployments. These commands display what would be backed up or restored without performing actual operations.
  block        Block Node operations for creating, modifying, and destroying resources. These commands require the presence of an existing deployment.
  cluster-ref  Manages the relationship between Kubernetes context names and Solo cluster references which are an alias for a kubernetes context.
  consensus    Consensus Node operations for creating, modifying, and destroying resources. These commands require the presence of an existing deployment.
  deployment   Create, modify, and delete deployment configurations. Deployments are required for most of the other commands.
  explorer     Explorer Node operations for creating, modifying, and destroying resources.These commands require the presence of an existing deployment.
  keys         Consensus key generation operations
  ledger       System, Account, and Crypto ledger-based management operations. These commands require an operational set of consensus nodes and may require an operational mirror node.
  mirror       Mirror Node operations for creating, modifying, and destroying resources. These commands require the presence of an existing deployment.
  relay        RPC Relay Node operations for creating, modifying, and destroying resources. These commands require the presence of an existing deployment.
  one-shot     One Shot commands for new and returning users who need a preset environment type. These commands use reasonable defaults to provide a single command out of box experience.
  rapid-fire   Commands for performing load tests a Solo deployment

Options:


     --dev                 Enable developer mode           [boolean] [default: false]
     --force-port-forward  Force port forward to access    [boolean] [default: true]
                           the network services
-v,  --version             Show version number             [boolean]
init
>> environment variable 'ONE_SHOT_WITH_BLOCK_NODE' exists, using its value
 init

Initialize local environment

Options:


     --cache-dir           Local cache directory           [string] [default: "/Users/user/.solo/cache"]
     --dev                 Enable developer mode           [boolean] [default: false]
     --force-port-forward  Force port forward to access    [boolean] [default: true]
                           the network services
-q,  --quiet-mode          Quiet mode, do not prompt for   [boolean] [default: false]
                           confirmation
-u,  --user                Optional user name used for     [string]
                           local configuration. Only
                           accepts letters and numbers.
                           Defaults to the username
                           provided by the OS
-v,  --version             Show version number             [boolean]
config
>> environment variable 'ONE_SHOT_WITH_BLOCK_NODE' exists, using its value
 config

Backup and restore component configurations for Solo deployments. These commands display what would be backed up or restored without performing actual operations.

Commands:
  config ops   Configuration backup and restore operations

Options:


     --dev                 Enable developer mode           [boolean] [default: false]
     --force-port-forward  Force port forward to access    [boolean] [default: true]
                           the network services
-v,  --version             Show version number             [boolean]
config ops
>> environment variable 'ONE_SHOT_WITH_BLOCK_NODE' exists, using its value
 config ops

Configuration backup and restore operations

Commands:
  config ops backup             Display backup plan for all component configurations of a deployment. Shows what files and configurations would be backed up without performing the actual backup.
  config ops restore-config     Restore component configurations from backup. Imports ConfigMaps, Secrets, logs, and state files for a running deployment.
  config ops restore-clusters   Restore Kind clusters from backup directory structure. Creates clusters, sets up Docker network, installs MetalLB, and initializes cluster configurations. Does not deploy network components.
  config ops restore-network    Deploy network components to existing clusters from backup. Deploys consensus nodes, block nodes, mirror nodes, explorers, and relay nodes. Requires clusters to be already created (use restore-clusters first).

Options:


     --dev                 Enable developer mode           [boolean] [default: false]
     --force-port-forward  Force port forward to access    [boolean] [default: true]
                           the network services
-v,  --version             Show version number             [boolean]
block
>> environment variable 'ONE_SHOT_WITH_BLOCK_NODE' exists, using its value
 block

Block Node operations for creating, modifying, and destroying resources. These commands require the presence of an existing deployment.

Commands:
  block node   Create, manage, or destroy block node instances. Operates on a single block node instance at a time.

Options:


     --dev                 Enable developer mode           [boolean] [default: false]
     --force-port-forward  Force port forward to access    [boolean] [default: true]
                           the network services
-v,  --version             Show version number             [boolean]
block node
>> environment variable 'ONE_SHOT_WITH_BLOCK_NODE' exists, using its value
 block node

Create, manage, or destroy block node instances. Operates on a single block node instance at a time.

Commands:
  block node add               Creates and configures a new block node instance for the specified deployment using the specified Kubernetes cluster. The cluster must be accessible and attached to the specified deployment.
  block node destroy           Destroys a single block node instance in the specified deployment. Requires access to all Kubernetes clusters attached to the deployment.
  block node upgrade           Upgrades a single block node instance in the specified deployment. Requires access to all Kubernetes clusters attached to the deployment.
  block node add-external      Add an external block node for the specified deployment. You can specify the priority and consensus nodes to which to connect or use the default settings.
  block node delete-external   Deletes an external block node from the specified deployment.

Options:


     --dev                 Enable developer mode           [boolean] [default: false]
     --force-port-forward  Force port forward to access    [boolean] [default: true]
                           the network services
-v,  --version             Show version number             [boolean]
cluster-ref
>> environment variable 'ONE_SHOT_WITH_BLOCK_NODE' exists, using its value
 cluster-ref

Manages the relationship between Kubernetes context names and Solo cluster references which are an alias for a kubernetes context.

Commands:
  cluster-ref config   List, create, manage, and remove associations between Kubernetes contexts and Solo cluster references.

Options:


     --dev                 Enable developer mode           [boolean] [default: false]
     --force-port-forward  Force port forward to access    [boolean] [default: true]
                           the network services
-v,  --version             Show version number             [boolean]
cluster-ref config
>> environment variable 'ONE_SHOT_WITH_BLOCK_NODE' exists, using its value
 cluster-ref config

List, create, manage, and remove associations between Kubernetes contexts and Solo cluster references.

Commands:
  cluster-ref config connect      Creates a new internal Solo cluster name to a Kubernetes context or maps a Kubernetes context to an existing internal Solo cluster reference
  cluster-ref config disconnect   Removes the Kubernetes context associated with an internal Solo cluster reference.
  cluster-ref config list         Lists the configured Kubernetes context to Solo cluster reference mappings.
  cluster-ref config info         Displays the status information and attached deployments for a given Solo cluster reference mapping.
  cluster-ref config setup        Setup cluster with shared components
  cluster-ref config reset        Uninstall shared components from cluster

Options:


     --dev                 Enable developer mode           [boolean] [default: false]
     --force-port-forward  Force port forward to access    [boolean] [default: true]
                           the network services
-v,  --version             Show version number             [boolean]
consensus
>> environment variable 'ONE_SHOT_WITH_BLOCK_NODE' exists, using its value
 consensus

Consensus Node operations for creating, modifying, and destroying resources. These commands require the presence of an existing deployment.

Commands:
  consensus network            Ledger/network wide consensus operations such as freeze, upgrade, and deploy. Operates on the entire ledger and all consensus node instances.
  consensus node               List, create, manage, or destroy consensus node instances. Operates on a single consensus node instance at a time.
  consensus state              List, download, and upload consensus node state backups to/from individual consensus node instances.
  consensus dev-node-add       Dev operations for adding consensus nodes.
  consensus dev-node-update    Dev operations for updating consensus nodes
  consensus dev-node-upgrade   Dev operations for upgrading consensus nodes
  consensus dev-node-delete    Dev operations for delete consensus nodes
  consensus dev-freeze         Dev operations for freezing consensus nodes

Options:


     --dev                 Enable developer mode           [boolean] [default: false]
     --force-port-forward  Force port forward to access    [boolean] [default: true]
                           the network services
-v,  --version             Show version number             [boolean]
consensus network
>> environment variable 'ONE_SHOT_WITH_BLOCK_NODE' exists, using its value
 consensus network

Ledger/network wide consensus operations such as freeze, upgrade, and deploy. Operates on the entire ledger and all consensus node instances.

Commands:
  consensus network deploy    Installs and configures all consensus nodes for the deployment.
  consensus network destroy   Removes all consensus network components from the deployment.
  consensus network freeze    Initiates a network freeze for scheduled maintenance or upgrades
  consensus network upgrade   Upgrades the software version running on all consensus nodes.

Options:


     --dev                 Enable developer mode           [boolean] [default: false]
     --force-port-forward  Force port forward to access    [boolean] [default: true]
                           the network services
-v,  --version             Show version number             [boolean]
consensus node
>> environment variable 'ONE_SHOT_WITH_BLOCK_NODE' exists, using its value
 consensus node

List, create, manage, or destroy consensus node instances. Operates on a single consensus node instance at a time.

Commands:
  consensus node setup     Setup node with a specific version of Hedera platform
  consensus node start     Start a node
  consensus node stop      Stop a node
  consensus node restart   Restart all nodes of the network
  consensus node refresh   Reset and restart a node
  consensus node add       Adds a node with a specific version of Hedera platform
  consensus node update    Update a node with a specific version of Hedera platform
  consensus node destroy   Delete a node with a specific version of Hedera platform

Options:


     --dev                 Enable developer mode           [boolean] [default: false]
     --force-port-forward  Force port forward to access    [boolean] [default: true]
                           the network services
-v,  --version             Show version number             [boolean]
consensus state
>> environment variable 'ONE_SHOT_WITH_BLOCK_NODE' exists, using its value
 consensus state

List, download, and upload consensus node state backups to/from individual consensus node instances.

Commands:
  consensus state download   Downloads a signed state from consensus node/nodes.

Options:


     --dev                 Enable developer mode           [boolean] [default: false]
     --force-port-forward  Force port forward to access    [boolean] [default: true]
                           the network services
-v,  --version             Show version number             [boolean]
consensus dev-node-add
>> environment variable 'ONE_SHOT_WITH_BLOCK_NODE' exists, using its value
 consensus dev-node-add

Dev operations for adding consensus nodes.

Commands:
  consensus dev-node-add prepare               Prepares the addition of a node with a specific version of Hedera platform
  consensus dev-node-add submit-transactions   Submits NodeCreateTransaction and Upgrade transactions to the network nodes
  consensus dev-node-add execute               Executes the addition of a previously prepared node

Options:


     --dev                 Enable developer mode           [boolean] [default: false]
     --force-port-forward  Force port forward to access    [boolean] [default: true]
                           the network services
-v,  --version             Show version number             [boolean]
consensus dev-node-update
>> environment variable 'ONE_SHOT_WITH_BLOCK_NODE' exists, using its value
 consensus dev-node-update

Dev operations for updating consensus nodes

Commands:
  consensus dev-node-update prepare               Prepare the deployment to update a node with a specific version of Hedera platform
  consensus dev-node-update submit-transactions   Submit transactions for updating a node with a specific version of Hedera platform
  consensus dev-node-update execute               Executes the updating of a node with a specific version of Hedera platform

Options:


     --dev                 Enable developer mode           [boolean] [default: false]
     --force-port-forward  Force port forward to access    [boolean] [default: true]
                           the network services
-v,  --version             Show version number             [boolean]
consensus dev-node-upgrade
>> environment variable 'ONE_SHOT_WITH_BLOCK_NODE' exists, using its value
 consensus dev-node-upgrade

Dev operations for upgrading consensus nodes

Commands:
  consensus dev-node-upgrade prepare               Prepare for upgrading network
  consensus dev-node-upgrade submit-transactions   Submit transactions for upgrading network
  consensus dev-node-upgrade execute               Executes the upgrading the network

Options:


     --dev                 Enable developer mode           [boolean] [default: false]
     --force-port-forward  Force port forward to access    [boolean] [default: true]
                           the network services
-v,  --version             Show version number             [boolean]
consensus dev-node-delete
>> environment variable 'ONE_SHOT_WITH_BLOCK_NODE' exists, using its value
 consensus dev-node-delete

Dev operations for delete consensus nodes

Commands:
  consensus dev-node-delete prepare               Prepares the deletion of a node with a specific version of Hedera platform
  consensus dev-node-delete submit-transactions   Submits transactions to the network nodes for deleting a node
  consensus dev-node-delete execute               Executes the deletion of a previously prepared node

Options:


     --dev                 Enable developer mode           [boolean] [default: false]
     --force-port-forward  Force port forward to access    [boolean] [default: true]
                           the network services
-v,  --version             Show version number             [boolean]
consensus dev-freeze
>> environment variable 'ONE_SHOT_WITH_BLOCK_NODE' exists, using its value
 consensus dev-freeze

Dev operations for freezing consensus nodes

Commands:
  consensus dev-freeze prepare-upgrade   Prepare the network for a Freeze Upgrade operation
  consensus dev-freeze freeze-upgrade    Performs a Freeze Upgrade operation with on the network after it has been prepared with prepare-upgrade

Options:


     --dev                 Enable developer mode           [boolean] [default: false]
     --force-port-forward  Force port forward to access    [boolean] [default: true]
                           the network services
-v,  --version             Show version number             [boolean]
deployment
>> environment variable 'ONE_SHOT_WITH_BLOCK_NODE' exists, using its value
 deployment

Create, modify, and delete deployment configurations. Deployments are required for most of the other commands.

Commands:
  deployment cluster       View and manage Solo cluster references used by a deployment.
  deployment config        List, view, create, delete, and import deployments. These commands affect the local configuration only.
  deployment diagnostics   Capture diagnostic information such as logs, signed states, and ledger/network/node configurations.

Options:


     --dev                 Enable developer mode           [boolean] [default: false]
     --force-port-forward  Force port forward to access    [boolean] [default: true]
                           the network services
-v,  --version             Show version number             [boolean]
deployment cluster
>> environment variable 'ONE_SHOT_WITH_BLOCK_NODE' exists, using its value
 deployment cluster

View and manage Solo cluster references used by a deployment.

Commands:
  deployment cluster attach   Attaches a cluster reference to a deployment.

Options:


     --dev                 Enable developer mode           [boolean] [default: false]
     --force-port-forward  Force port forward to access    [boolean] [default: true]
                           the network services
-v,  --version             Show version number             [boolean]
deployment config
>> environment variable 'ONE_SHOT_WITH_BLOCK_NODE' exists, using its value
 deployment config

List, view, create, delete, and import deployments. These commands affect the local configuration only.

Commands:
  deployment config list     Lists all local deployment configurations.
  deployment config create   Creates a new local deployment configuration.
  deployment config delete   Removes a local deployment configuration.

Options:


     --dev                 Enable developer mode           [boolean] [default: false]
     --force-port-forward  Force port forward to access    [boolean] [default: true]
                           the network services
-v,  --version             Show version number             [boolean]
deployment diagnostics
>> environment variable 'ONE_SHOT_WITH_BLOCK_NODE' exists, using its value
 deployment diagnostics

Capture diagnostic information such as logs, signed states, and ledger/network/node configurations.

Commands:
  deployment diagnostics all           Captures logs, configs, and diagnostic artifacts from all consensus nodes and test connections.
  deployment diagnostics connections   Tests connections to Consensus, Relay, Explorer, Mirror and Block nodes.
  deployment diagnostics logs          Get logs and configuration files from consensus node/nodes.

Options:


     --dev                 Enable developer mode           [boolean] [default: false]
     --force-port-forward  Force port forward to access    [boolean] [default: true]
                           the network services
-v,  --version             Show version number             [boolean]
explorer
>> environment variable 'ONE_SHOT_WITH_BLOCK_NODE' exists, using its value
 explorer

Explorer Node operations for creating, modifying, and destroying resources.These commands require the presence of an existing deployment.

Commands:
  explorer node   List, create, manage, or destroy explorer node instances. Operates on a single explorer node instance at a time.

Options:


     --dev                 Enable developer mode           [boolean] [default: false]
     --force-port-forward  Force port forward to access    [boolean] [default: true]
                           the network services
-v,  --version             Show version number             [boolean]
explorer node
>> environment variable 'ONE_SHOT_WITH_BLOCK_NODE' exists, using its value
 explorer node

List, create, manage, or destroy explorer node instances. Operates on a single explorer node instance at a time.

Commands:
  explorer node add       Adds and configures a new node instance.
  explorer node destroy   Deletes the specified node from the deployment.
  explorer node upgrade   Upgrades the specified node in the deployment.

Options:


     --dev                 Enable developer mode           [boolean] [default: false]
     --force-port-forward  Force port forward to access    [boolean] [default: true]
                           the network services
-v,  --version             Show version number             [boolean]
keys
>> environment variable 'ONE_SHOT_WITH_BLOCK_NODE' exists, using its value
 keys

Consensus key generation operations

Commands:
  keys consensus   Generate unique cryptographic keys (gossip or grpc TLS keys) for the Consensus Node instances.

Options:


     --dev                 Enable developer mode           [boolean] [default: false]
     --force-port-forward  Force port forward to access    [boolean] [default: true]
                           the network services
-v,  --version             Show version number             [boolean]
keys consensus
>> environment variable 'ONE_SHOT_WITH_BLOCK_NODE' exists, using its value
 keys consensus

Generate unique cryptographic keys (gossip or grpc TLS keys) for the Consensus Node instances.

Commands:
  keys consensus generate   Generates TLS keys required for consensus node communication.

Options:


     --dev                 Enable developer mode           [boolean] [default: false]
     --force-port-forward  Force port forward to access    [boolean] [default: true]
                           the network services
-v,  --version             Show version number             [boolean]
ledger
>> environment variable 'ONE_SHOT_WITH_BLOCK_NODE' exists, using its value
 ledger

System, Account, and Crypto ledger-based management operations. These commands require an operational set of consensus nodes and may require an operational mirror node.

Commands:
  ledger system    Perform a full ledger initialization on a new deployment, rekey privileged/system accounts, or setup network staking parameters.
  ledger account   View, list, create, update, delete, and import ledger accounts.
  ledger file      Upload or update files on the Hiero network.

Options:


     --dev                 Enable developer mode           [boolean] [default: false]
     --force-port-forward  Force port forward to access    [boolean] [default: true]
                           the network services
-v,  --version             Show version number             [boolean]
ledger system
>> environment variable 'ONE_SHOT_WITH_BLOCK_NODE' exists, using its value
 ledger system

Perform a full ledger initialization on a new deployment, rekey privileged/system accounts, or setup network staking parameters.

Commands:
  ledger system init   Re-keys ledger system accounts and consensus node admin keys with uniquely generated ED25519 private keys and will stake consensus nodes.

Options:


     --dev                 Enable developer mode           [boolean] [default: false]
     --force-port-forward  Force port forward to access    [boolean] [default: true]
                           the network services
-v,  --version             Show version number             [boolean]
ledger account
>> environment variable 'ONE_SHOT_WITH_BLOCK_NODE' exists, using its value
 ledger account

View, list, create, update, delete, and import ledger accounts.

Commands:
  ledger account update       Updates an existing ledger account.
  ledger account create       Creates a new ledger account.
  ledger account info         Gets the account info including the current amount of HBAR
  ledger account predefined   Creates predefined accounts used by one-shot deployments.

Options:


     --dev                 Enable developer mode           [boolean] [default: false]
     --force-port-forward  Force port forward to access    [boolean] [default: true]
                           the network services
-v,  --version             Show version number             [boolean]
ledger file
>> environment variable 'ONE_SHOT_WITH_BLOCK_NODE' exists, using its value
 ledger file

Upload or update files on the Hiero network.

Commands:
  ledger file create   Create a new file on the Hiero network
  ledger file update   Update an existing file on the Hiero network

Options:


     --dev                 Enable developer mode           [boolean] [default: false]
     --force-port-forward  Force port forward to access    [boolean] [default: true]
                           the network services
-v,  --version             Show version number             [boolean]
mirror
>> environment variable 'ONE_SHOT_WITH_BLOCK_NODE' exists, using its value
 mirror

Mirror Node operations for creating, modifying, and destroying resources. These commands require the presence of an existing deployment.

Commands:
  mirror node   List, create, manage, or destroy mirror node instances. Operates on a single mirror node instance at a time.

Options:


     --dev                 Enable developer mode           [boolean] [default: false]
     --force-port-forward  Force port forward to access    [boolean] [default: true]
                           the network services
-v,  --version             Show version number             [boolean]
mirror node
>> environment variable 'ONE_SHOT_WITH_BLOCK_NODE' exists, using its value
 mirror node

List, create, manage, or destroy mirror node instances. Operates on a single mirror node instance at a time.

Commands:
  mirror node add       Adds and configures a new node instance.
  mirror node destroy   Deletes the specified node from the deployment.
  mirror node upgrade   Upgrades the specified node from the deployment.

Options:


     --dev                 Enable developer mode           [boolean] [default: false]
     --force-port-forward  Force port forward to access    [boolean] [default: true]
                           the network services
-v,  --version             Show version number             [boolean]
relay
>> environment variable 'ONE_SHOT_WITH_BLOCK_NODE' exists, using its value
 relay

RPC Relay Node operations for creating, modifying, and destroying resources. These commands require the presence of an existing deployment.

Commands:
  relay node   List, create, manage, or destroy relay node instances. Operates on a single relay node instance at a time.

Options:


     --dev                 Enable developer mode           [boolean] [default: false]
     --force-port-forward  Force port forward to access    [boolean] [default: true]
                           the network services
-v,  --version             Show version number             [boolean]
relay node
>> environment variable 'ONE_SHOT_WITH_BLOCK_NODE' exists, using its value
 relay node

List, create, manage, or destroy relay node instances. Operates on a single relay node instance at a time.

Commands:
  relay node add       Adds and configures a new node instance.
  relay node destroy   Deletes the specified node from the deployment.
  relay node upgrade   Upgrades the specified node from the deployment.

Options:


     --dev                 Enable developer mode           [boolean] [default: false]
     --force-port-forward  Force port forward to access    [boolean] [default: true]
                           the network services
-v,  --version             Show version number             [boolean]
one-shot
>> environment variable 'ONE_SHOT_WITH_BLOCK_NODE' exists, using its value
 one-shot

One Shot commands for new and returning users who need a preset environment type. These commands use reasonable defaults to provide a single command out of box experience.

Commands:
  one-shot single   Creates a uniquely named deployment with a single consensus node, mirror node, block node, relay node, and explorer node.
  one-shot multi    Creates a uniquely named deployment with multiple consensus nodes, mirror node, block node, relay node, and explorer node.
  one-shot falcon   Creates a uniquely named deployment with optional chart values override using --values-file.
  one-shot show     Display information about one-shot deployments.

Options:


     --dev                 Enable developer mode           [boolean] [default: false]
     --force-port-forward  Force port forward to access    [boolean] [default: true]
                           the network services
-v,  --version             Show version number             [boolean]
one-shot single
>> environment variable 'ONE_SHOT_WITH_BLOCK_NODE' exists, using its value
 one-shot single

Creates a uniquely named deployment with a single consensus node, mirror node, block node, relay node, and explorer node.

Commands:
  one-shot single deploy    Deploys all required components for the selected one shot configuration.
  one-shot single destroy   Removes the deployed resources for the selected one shot configuration.

Options:


     --dev                 Enable developer mode           [boolean] [default: false]
     --force-port-forward  Force port forward to access    [boolean] [default: true]
                           the network services
-v,  --version             Show version number             [boolean]
one-shot multi
>> environment variable 'ONE_SHOT_WITH_BLOCK_NODE' exists, using its value
 one-shot multi

Creates a uniquely named deployment with multiple consensus nodes, mirror node, block node, relay node, and explorer node.

Commands:
  one-shot multi deploy    Deploys all required components for the selected multiple node one shot configuration.
  one-shot multi destroy   Removes the deployed resources for the selected multiple node one shot configuration.

Options:


     --dev                 Enable developer mode           [boolean] [default: false]
     --force-port-forward  Force port forward to access    [boolean] [default: true]
                           the network services
-v,  --version             Show version number             [boolean]
one-shot falcon
>> environment variable 'ONE_SHOT_WITH_BLOCK_NODE' exists, using its value
 one-shot falcon

Creates a uniquely named deployment with optional chart values override using --values-file.

Commands:
  one-shot falcon deploy    Deploys all required components for the selected one shot configuration (with optional values file).
  one-shot falcon destroy   Removes the deployed resources for the selected one shot configuration (with optional values file).

Options:


     --dev                 Enable developer mode           [boolean] [default: false]
     --force-port-forward  Force port forward to access    [boolean] [default: true]
                           the network services
-v,  --version             Show version number             [boolean]
one-shot show
>> environment variable 'ONE_SHOT_WITH_BLOCK_NODE' exists, using its value
 one-shot show

Display information about one-shot deployments.

Commands:
  one-shot show deployment   Display information about the last one-shot deployment including name, versions, and deployed components.

Options:


     --dev                 Enable developer mode           [boolean] [default: false]
     --force-port-forward  Force port forward to access    [boolean] [default: true]
                           the network services
-v,  --version             Show version number             [boolean]
rapid-fire
>> environment variable 'ONE_SHOT_WITH_BLOCK_NODE' exists, using its value
 rapid-fire

Commands for performing load tests a Solo deployment

Commands:
  rapid-fire load      Run load tests using the network load generator with the selected class.
  rapid-fire destroy   Uninstall the Network Load Generator Helm chart and clean up resources.

Options:


     --dev                 Enable developer mode           [boolean] [default: false]
     --force-port-forward  Force port forward to access    [boolean] [default: true]
                           the network services
-v,  --version             Show version number             [boolean]
rapid-fire load
>> environment variable 'ONE_SHOT_WITH_BLOCK_NODE' exists, using its value
 rapid-fire load

Run load tests using the network load generator with the selected class.

Commands:
  rapid-fire load start   Start a rapid-fire load test using the selected class.
  rapid-fire load stop    Stop any running processes using the selected class.

Options:


     --dev                 Enable developer mode           [boolean] [default: false]
     --force-port-forward  Force port forward to access    [boolean] [default: true]
                           the network services
-v,  --version             Show version number             [boolean]
rapid-fire destroy
>> environment variable 'ONE_SHOT_WITH_BLOCK_NODE' exists, using its value
 rapid-fire destroy

Uninstall the Network Load Generator Helm chart and clean up resources.

Commands:
  rapid-fire destroy all   Uninstall the Network Load Generator Helm chart and remove all related resources.

Options:


     --dev                 Enable developer mode           [boolean] [default: false]
     --force-port-forward  Force port forward to access    [boolean] [default: true]
                           the network services
-v,  --version             Show version number             [boolean]
7 - FAQ
Frequently asked questions about the Solo CLI tool.
How can I set up a Solo network in a single command?
You can run one of the following commands depending on your needs:
Single Node Deployment (recommended for development):
npx @hashgraph/solo:@latest one-shot single deploy
Multiple Node Deployment (for testing consensus scenarios):
npx @hashgraph/solo:@latest one-shot multi deploy
Falcon Deployment (with custom configuration file):
npx @hashgraph/solo:@latest one-shot falcon deploy --values-file falcon-values.yaml
The falcon deployment allows you to configure all network components (consensus nodes, mirror node, explorer, relay, and block node) through a single YAML configuration file.
More documentation can be found here:
How can I tear down a Solo network in a single command?
You can run one of the following commands depending on how you deployed:
Single Node Teardown:
npx @hashgraph/solo:@latest one-shot single destroy
Multiple Node Teardown:
npx @hashgraph/solo:@latest one-shot multiple destroy
Falcon Deployment Teardown:
npx @hashgraph/solo:@latest one-shot falcon destroy
How can I avoid using genesis keys ?
You can run solo ledger system init anytime after solo consensus node start.
Where can I find the default account keys ?
By default, Solo leverages the Hiero Consensus Node well known ED25519 private genesis key: 302e020100300506032b65700422042091132178e72057a1d7528025956fe39b0b847f200ab59b2fdd367017f3087137, the genesis public key is: 302a300506032b65700321000aa8e21064c61eab86e2a9c164565b4e7a9a4146106e0a6cd03a8c395a110e92.
Unless changed it is the private key for the default operator account 0.0.2 of the consensus network.
It is defined in Hiero source code Link
What is the difference between ECDSA keys and ED25519 keys?
See https://docs.hedera.com/hedera/core-concepts/keys-and-signatures for a detailed answer.
Where can I find the EVM compatible private key?
You will need to use ECDSA keys for EVM tooling compatibility. If you take the privateKeyRaw provided by Solo and prefix it with 0x you will have the private key used by Ethereum compatible tools.
How do I get the key for an account?
Use the following command to get account balance and private key of the account 0.0.1007:
# get account info of 0.0.1007 and also show the private key
solo ledger account info --account-id 0.0.1007 --deployment solo-deployment  --private-key
The output would be similar to the following:
{
 "accountId": "0.0.1007",
 "privateKey": "302e020100300506032b657004220420411a561013bceabb8cb83e3dc5558d052b9bd6a8977b5a7348bf9653034a29d7",
 "privateKeyRaw": "411a561013bceabb8cb83e3dc5558d052b9bd6a8977b5a7348bf9653034a29d7"
 "publicKey": "302a300506032b65700321001d8978e647aca1195c54a4d3d5dc469b95666de14e9b6edde8ed337917b96013",
 "balance": 100
}
How to handle error “failed to setup chart repositories”
If during the installation of solo-charts you see the error similar to the following:
failed to setup chart repositories,
repository name (hedera-json-rpc-relay) already exists
You need to remove the old helm repo manually, first run command helm repo list to
see the list of helm repos, and then run helm repo remove <repo-name> to remove the repo.
For example:
helm repo list

NAME                 	URL
haproxy-ingress      	https://haproxy-ingress.github.io/charts
haproxytech          	https://haproxytech.github.io/helm-charts
metrics-server       	https://kubernetes-sigs.github.io/metrics-server/
metallb              	https://metallb.github.io/metallb
mirror               	https://hashgraph.github.io/hedera-mirror-node/charts
hedera-json-rpc-relay	https://hashgraph.github.io/hedera-json-rpc-relay/charts
Next run the command to remove the repo:
helm repo remove hedera-json-rpc-relay
8 - Troubleshooting
Solutions to common issues when using Solo, plus guidance on getting help.
This guide covers common issues you may encounter when using Solo and how to resolve them.
Common Issues and Solutions
Pods Not Starting
If pods remain in Pending or CrashLoopBackOff state:
Check Pod Events
# List all pods in your namespace
kubectl get pods -n "${SOLO_NAMESPACE}"

# Describe a specific pod to see events
kubectl describe pod -n "${SOLO_NAMESPACE}" <pod-name>
Common Causes and Fixes
| Symptom | Cause | Solution |
|---|---|---|
Pending state | Insufficient resources | Increase Docker memory/CPU allocation |
Pending state | Storage issues | Check available disk space, restart Docker |
CrashLoopBackOff | Container failing to start | Check pod logs: kubectl logs -n "${SOLO_NAMESPACE}" <pod-name> |
ImagePullBackOff | Can’t pull container images | Check internet connection, Docker Hub rate limits |
Resource Allocation
Ensure Docker has adequate resources:
- Memory: At least 12 GB (16 GB recommended)
- CPU: At least 6 cores (8 recommended)
- Disk: At least 20 GB free
On Docker Desktop, check: Settings > Resources
Connection Refused Errors
If you can’t connect to network endpoints:
Check Service Endpoints
# List all services
kubectl get svc -n "${SOLO_NAMESPACE}"

# Check if endpoints are populated
kubectl get endpoints -n "${SOLO_NAMESPACE}"
Manual Port Forwarding
If automatic port forwarding isn’t working:
# Consensus Node (gRPC)
kubectl port-forward svc/haproxy-node1-svc -n "${SOLO_NAMESPACE}" 50211:50211 &

# Explorer UI
kubectl port-forward svc/hiero-explorer -n "${SOLO_NAMESPACE}" 8080:8080 &

# Mirror Node gRPC
kubectl port-forward svc/mirror-1-grpc -n "${SOLO_NAMESPACE}" 5600:5600 &

# Mirror Node REST
kubectl port-forward svc/mirror-1-rest -n "${SOLO_NAMESPACE}" 5551:80 &

# JSON RPC Relay
kubectl port-forward svc/relay-node1-hedera-json-rpc-relay -n "${SOLO_NAMESPACE}" 7546:7546 &
Node Synchronization Issues
If nodes aren’t forming consensus or transactions aren’t being processed:
Check Node Status
# Download state information
solo consensus state download --deployment "${SOLO_DEPLOYMENT}" --node-aliases node1

# Check logs for gossip issues
kubectl logs -n "${SOLO_NAMESPACE}" network-node-0 | grep -i gossip
Restart Problematic Nodes
# Refresh a specific node
solo consensus node refresh --node-aliases node1 --deployment "${SOLO_DEPLOYMENT}"

# Or restart all nodes
solo consensus node restart --deployment "${SOLO_DEPLOYMENT}"
Mirror Node Not Importing Records
If the mirror node isn’t showing new transactions:
Verify Pinger is Running
The --pinger flag should have been used when deploying the mirror node. The pinger sends periodic transactions to ensure record files are created.
# Check if pinger pod is running
kubectl get pods -n "${SOLO_NAMESPACE}" | grep pinger
Redeploy Mirror Node with Pinger
# Destroy existing mirror node
solo mirror node destroy --deployment "${SOLO_DEPLOYMENT}" --force

# Redeploy with pinger enabled
solo mirror node add --deployment "${SOLO_DEPLOYMENT}" --cluster-ref kind-${SOLO_CLUSTER_NAME} --enable-ingress --pinger
Helm Repository Errors
If you see errors like repository name already exists:
# List current Helm repos
helm repo list

# Remove conflicting repository
helm repo remove <repo-name>

# Example: remove hedera-json-rpc-relay
helm repo remove hedera-json-rpc-relay
Kind Cluster Issues
Cluster Won’t Start
# Delete and recreate the cluster
kind delete cluster -n "${SOLO_CLUSTER_NAME}"
kind create cluster -n "${SOLO_CLUSTER_NAME}"
Docker Context Issues
Ensure Docker is running and the correct context is set:
# Check Docker is running
docker ps

# On macOS/Windows, ensure Docker Desktop is started
# On Linux, ensure the Docker daemon is running:
sudo systemctl start docker
Old Installation Artifacts
Previous Solo installations can cause issues. Clean up Solo-managed clusters:
# Delete only Solo-managed Kind clusters (names starting with "solo")
kind get clusters | grep '^solo' | while read cluster; do
  kind delete cluster -n "$cluster"
done

# Remove Solo configuration and cache
rm -rf ~/.solo
Collecting Diagnostic Information
Before seeking help, collect diagnostic information:
Solo Diagnostics
# Capture comprehensive diagnostics
solo consensus diagnostics all --deployment "${SOLO_DEPLOYMENT}"
This creates logs and diagnostic files in ~/.solo/logs/.
Key Log Files
| File | Description |
|---|---|
~/.solo/logs/solo.log | Solo CLI command logs |
~/.solo/logs/hashgraph-sdk.log | SDK transaction logs |
Kubernetes Diagnostics
# Cluster info
kubectl cluster-info

# All resources in namespace
kubectl get all -n "${SOLO_NAMESPACE}"

# Recent events
kubectl get events -n "${SOLO_NAMESPACE}" --sort-by='.lastTimestamp'

# Node resource usage
kubectl top nodes
kubectl top pods -n "${SOLO_NAMESPACE}"
Getting Help
1. Check the Logs
Always start by examining logs:
# Solo logs
cat ~/.solo/logs/solo.log | tail -100

# Pod logs
kubectl logs -n "${SOLO_NAMESPACE}" <pod-name>
2. Documentation
- Solo User Guide - Basic setup and usage
- Advanced Deployments - Complex deployment scenarios
- FAQ - Common questions and answers
- CLI Commands - Complete command reference
3. GitHub Issues
Report bugs or request features:
- Repository: https://github.com/hiero-ledger/solo/issues
When opening an issue, include:
- Solo version (
solo --version) - Operating system and version
- Docker/Kubernetes versions
- Steps to reproduce the issue
- Relevant log output
- Any error messages
4. Community Support
Join the community for discussions and help:
- Hedera Discord: Look for the
#solochannel - Hiero Community: https://hiero.org/community
Frequently Asked Questions
How do I reset everything and start fresh?
# Delete only Solo-managed clusters and Solo config
kind get clusters | grep '^solo' | while read cluster; do
  kind delete cluster -n "$cluster"
done
rm -rf ~/.solo

# Deploy fresh
solo one-shot single deploy
How do I check which version of Solo I’m running?
solo --version

# For machine-readable output:
solo --version -o json
Where are my keys stored?
Keys are stored in ~/.solo/cache/keys/. This directory contains:
- TLS certificates (
hedera-node*.crt,hedera-node*.key) - Signing keys (
s-private-node*.pem,s-public-node*.pem)
How do I connect my application to the local network?
Use these endpoints:
- gRPC (Hedera SDK):
localhost:50211, Node ID:0.0.3 - JSON RPC (Ethereum tools):
http://localhost:7546 - Mirror Node REST:
http://localhost:5551/api/v1/
Can I run Solo on a remote server?
Yes, Solo can deploy to any Kubernetes cluster. See Advanced Deployments for details.
9 - Using Solo with Mirror Node
This document describes how to use Solo with Mirror Node.
Using Solo with mirror node
User can deploy a Solo network with Mirror Node by running the following command:
export SOLO_CLUSTER_NAME=solo-cluster
export SOLO_NAMESPACE=solo-e2e
export SOLO_CLUSTER_SETUP_NAMESPACE=solo-cluster-setup
export SOLO_DEPLOYMENT=solo-deployment

rm -Rf ~/.solo
kind delete cluster -n "${SOLO_CLUSTER_NAME}"
kind create cluster -n "${SOLO_CLUSTER_NAME}"
solo init
solo cluster-ref config setup --cluster-setup-namespace "${SOLO_CLUSTER_SETUP_NAMESPACE}"
solo cluster-ref config connect --cluster-ref ${SOLO_CLUSTER_NAME} --context kind-${SOLO_CLUSTER_NAME}
solo deployment config create --namespace "${SOLO_NAMESPACE}" --deployment "${SOLO_DEPLOYMENT}"
solo deployment cluster attach --deployment "${SOLO_DEPLOYMENT}" --cluster-ref ${SOLO_CLUSTER_NAME} --num-consensus-nodes 2
solo keys consensus generate --deployment "${SOLO_DEPLOYMENT}" --gossip-keys --tls-keys -i node1,node2
solo consensus network deploy --deployment "${SOLO_DEPLOYMENT}" -i node1,node2
solo consensus node setup     --deployment "${SOLO_DEPLOYMENT}" -i node1,node2
solo consensus node start     --deployment "${SOLO_DEPLOYMENT}" -i node1,node2
solo mirror node add --deployment "${SOLO_DEPLOYMENT}" --cluster-ref ${SOLO_CLUSTER_NAME} --enable-ingress --pinger
solo explorer node add --deployment "${SOLO_DEPLOYMENT}" --cluster-ref ${SOLO_CLUSTER_NAME}
The --pinger flag in solo mirror node add starts a pinging service that sends transactions to the network at regular intervals. This is needed because the record file is not imported into the mirror node until the next one is created.
Then you can access the Explorer at http://localhost:8080
Or you can use Task tool to deploy Solo network with Mirror Node with a single command link
Next, you can try to create a few accounts with Solo and see the transactions in the Explorer.
solo ledger account create --deployment solo-deployment --hbar-amount 100
solo ledger account create --deployment solo-deployment --hbar-amount 100
Or you can use Hedera JavaScript SDK examples to create topic, submit message and subscribe to the topic.
If you need to access mirror node service directly, use the following command to enable port forwarding, or just use localhost:8081 as it should have all the mirror node services exposed to this port:
kubectl port-forward svc/mirror-1-grpc -n "${SOLO_NAMESPACE}" 5600:5600 &
grpcurl -plaintext "${GRPC_IP:-127.0.0.1}:5600" list

kubectl port-forward svc/mirror-1-rest -n "${SOLO_NAMESPACE}" svc/mirror-1-rest 5551:80 &
curl -s "http://${REST_IP:-127.0.0.1}:5551/api/v1/transactions?limit=1"

kubectl port-forward service/mirror-1-restjava -n "${SOLO_NAMESPACE}" 8084:80 &
curl -s "http://${REST_IP:-127.0.0.1}:8084/api/v1/accounts/0.0.2/allowances/nfts"
10 - Using Solo with Hiero JavaScript SDK
This page describes how to use Solo with Hiero JavaScript SDK. It includes instructions for setting up a local Solo network, creating test accounts, and running example scripts.
Using Solo with the Hiero JavaScript SDK
First, please follow solo repository README to install solo and Docker Desktop. You also need to install the Taskfile tool following the instructions here.
Then we start with launching a local Solo network with the following commands:
# launch a local Solo network with mirror node and hedera explorer
cd scripts
task default-with-mirror
Then create a new test account with the following command:
npm run solo-test -- ledger account create --deployment solo-deployment --hbar-amount 100
The output would be similar to the following:
 *** new account created ***
-------------------------------------------------------------------------------
{
 "accountId": "0.0.1007",
 "publicKey": "302a300506032b65700321001d8978e647aca1195c54a4d3d5dc469b95666de14e9b6edde8ed337917b96013",
 "balance": 100
}
Then use the following command to get private key of the account 0.0.1007:
npm run solo-test -- ledger account info --account-id 0.0.1007 --deployment solo-deployment --private-key
The output would be similar to the following:
{
 "accountId": "0.0.1007",
 "privateKey": "302e020100300506032b657004220420411a561013bceabb8cb83e3dc5558d052b9bd6a8977b5a7348bf9653034a29d7",
 "privateKeyRaw": "411a561013bceabb8cb83e3dc5558d052b9bd6a8977b5a7348bf9653034a29d7"
 "publicKey": "302a300506032b65700321001d8978e647aca1195c54a4d3d5dc469b95666de14e9b6edde8ed337917b96013",
 "balance": 100
}
Next step please clone the Hiero Javascript SDK repository https://github.com/hiero-ledger/hiero-sdk-js.
At the root of the project hiero-sdk-js, create a file .env and add the following content:
# Hiero Operator Account ID
export OPERATOR_ID="0.0.1007"

# Hiero Operator Private Key
export OPERATOR_KEY="302a300506032b65700321001d8978e647aca1195c54a4d3d5dc469b95666de14e9b6edde8ed337917b96013"

# Hiero Network
export HEDERA_NETWORK="local-node"
Make sure to assign the value of accountId to OPERATOR_ID and the value of privateKey to OPERATOR_KEY.
Then try the following command to run the test
node examples/create-account.js
The output should be similar to the following:
private key = 302e020100300506032b6570042204208a3c1093c4df779c4aa980d20731899e0b509c7a55733beac41857a9dd3f1193
public key = 302a300506032b6570032100c55adafae7e85608ea893d0e2c77e2dae3df90ba8ee7af2f16a023ba2258c143
account id = 0.0.1009
Or try the topic creation example:
node scripts/create-topic.js
The output should be similar to the following:
topic id = 0.0.1008
topic sequence number = 1
Managing Files on the Network
Solo provides commands to create and update files on the Hiero network.
Creating a New File
To create a new file, use the file create command (no file ID needed):
npm run solo-test -- ledger file create --deployment solo-deployment --file-path ./config.json
This command will:
- Create a new file on the network
- Automatically handle large files (>4KB) by splitting them into chunks
- Display the system-assigned file ID
- Verify the uploaded content matches the local file
The output would be similar to:
✓ Initialize configuration
  File: config.json
  Size: 2048 bytes

✓ Load node client and treasury keys

✓ Create file on Hiero network
  ✓ Create new file
    Creating file with 2048 bytes...
    ✓ File created with ID: 0.0.1234

✓ Verify uploaded file
  Querying file contents to verify upload...
  Expected size: 2048 bytes
  Retrieved size: 2048 bytes
  ✓ File verification successful
  ✓ Size: 2048 bytes
  ✓ Content matches uploaded file

✅ File created successfully!
📄 File ID: 0.0.1234
Updating an Existing File
To update an existing file, use the file update command with the file ID:
npm run solo-test -- ledger file update --deployment solo-deployment --file-id 0.0.1234 --file-path ./updated-config.json
This command will:
- Verify the file exists on the network (errors if not found)
- Update the file content
- Automatically handle large files (>4KB) by splitting them into chunks
- Verify the updated content matches the local file
The output would be similar to:
✓ Initialize configuration
  File: updated-config.json
  Size: 3072 bytes
  File ID: 0.0.1234

✓ Load node client and treasury keys

✓ Check if file exists
  File 0.0.1234 exists. Proceeding with update.
  Current size: 2048 bytes
  Keys: 1

✓ Update file on Hiero network
  ✓ Update existing file
    Updating file with 3072 bytes...
    ✓ File updated successfully

✓ Verify uploaded file
  Querying file contents to verify upload...
  Expected size: 3072 bytes
  Retrieved size: 3072 bytes
  ✓ File verification successful
  ✓ Size: 3072 bytes
  ✓ Content matches uploaded file

✅ File updated successfully!
Note: For large files (>4KB), both commands automatically split the file into chunks and show progress:
✓ Create file on Hiero network
  ✓ Create new file
    Creating file with first 4096 bytes (multi-part create)...
    ✓ File created with ID: 0.0.1234
  ✓ Append remaining file content (chunk 1/3)
    Appending chunk 1/3 (4096 bytes, 8192 bytes remaining)...
  ✓ Append remaining file content (chunk 2/3)
    Appending chunk 2/3 (4096 bytes, 4096 bytes remaining)...
  ✓ Append remaining file content (chunk 3/3)
    Appending chunk 3/3 (4096 bytes, 0 bytes remaining)...
  ✓ Append remaining file content (3 chunks completed)
    ✓ Appended 3 chunks successfully
You can use Hiero Explorer to check transactions and topics created in the Solo network: http://localhost:8080/localnet/dashboard
Finally, after done with using solo, using the following command to tear down the Solo network:
task clean
Retrieving Logs
You can find log for running solo command under the directory ~/.solo/logs/
The file solo.log contains the logs for the solo command. The file hashgraph-sdk.log contains the logs from Solo client when sending transactions to network nodes.
11 - Hiero Consensus Node Platform Developer
This page provides information for developers who want to build and run Hiero Consensus Node testing application locally.
Use Solo with a Local Built Hiero Consensus Node Testing Application
First, please clone Hiero Consensus Node repo https://github.com/hiero-ledger/hiero-consensus-node/ and build the code
with ./gradlew assemble. If you need to run multiple nodes with different versions or releases, please duplicate the repo or build directories in
multiple directories, checkout to the respective version and build the code.
Then you can start the custom-built platform testing application with the following command:
SOLO_CLUSTER_NAME=solo-cluster
SOLO_NAMESPACE=solo-e2e
SOLO_CLUSTER_SETUP_NAMESPACE=solo-setup
SOLO_DEPLOYMENT=solo-deployment

rm -Rf ~/.solo
kind delete cluster -n "${SOLO_CLUSTER_NAME}"
kind create cluster -n "${SOLO_CLUSTER_NAME}"
solo init
solo cluster-ref config setup -s "${SOLO_CLUSTER_SETUP_NAMESPACE}"

solo cluster-ref config connect --cluster-ref ${SOLO_CLUSTER_NAME} --context kind-${SOLO_CLUSTER_NAME}
solo deployment config create --namespace "${SOLO_NAMESPACE}" --deployment "${SOLO_DEPLOYMENT}"
solo deployment cluster attach --deployment "${SOLO_DEPLOYMENT}" --cluster-ref ${SOLO_CLUSTER_NAME} --num-consensus-nodes 3

solo keys consensus generate --deployment "${SOLO_DEPLOYMENT}" --gossip-keys --tls-keys -i node1,node2,node3
solo consensus network deploy --deployment "${SOLO_DEPLOYMENT}" -i node1,node2,node3

# option 1) if all nodes are running the same version of Hiero app
solo consensus node setup --deployment "${SOLO_DEPLOYMENT}" -i node1,node2,node3 --local-build-path ../hiero-consensus-node/hedera-node/data/

# option 2) if each node is running different version of Hiero app, please provide different paths to the local repositories
solo consensus node setup --deployment "${SOLO_DEPLOYMENT}" -i node1,node2,node3 --local-build-path node1=../hiero-consensus-node/hedera-node/data/,node1=<path2>,node3=<path3>

solo consensus node start --deployment "${SOLO_DEPLOYMENT}" -i node1,node2,node3
It is possible that different nodes are running different versions of Hiero app, as long as in the above setup command, each node0, or node1 is given different paths to the local repositories.
If need to provide customized configuration files for Hedera application, please use the following flags with consensus network deploy command:
--settings-txt- to provide custom settings.txt file--api-permission-properties- to provide custom api-permission.properties file--bootstrap-properties- to provide custom bootstrap.properties file--application-properties- to provide custom application.properties file
For example:
solo consensus network deploy --deployment "${SOLO_DEPLOYMENT}" -i node1,node2,node3 --settings-txt <path-to-settings-txt>
Block Node Routing Configuration
For network delay testing and simulating different network topologies, you can configure how each consensus node sends blocks to specific block nodes using the --priority-mapping flag:
solo block node add --deployment "${SOLO_DEPLOYMENT}" --priority-mapping node1,node2
solo block node add --deployment "${SOLO_DEPLOYMENT}" --priority-mapping node2,node3
solo block node add --deployment "${SOLO_DEPLOYMENT}" --priority-mapping node1
This configuration maps consensus node names to arrays of block node IDs. For example:
node1sends blocks to block nodes 1 and 3node2sends blocks to block node 2node3sends blocks to block nodes 1 and 2
12 - Hiero Consensus Node Execution Developer
Use port-forwarding to access Hiero Consensus Node network services.
Hiero Consensus Node Execution Developer
Once the nodes are up, you may now expose various services (using k9s (shift-f) or kubectl port-forward) and access. Below are most used services that you may expose.
- where the ’node name’ for Node ID = 0, is
node1(node${ nodeId + 1 }) - Node services:
network-<node name>-svc - HAProxy:
haproxy-<node name>-svc# enable port forwarding for haproxy # node1 grpc port accessed by localhost:50211 kubectl port-forward svc/haproxy-node1-svc -n "${SOLO_NAMESPACE}" 51211:50211 & # node2 grpc port accessed by localhost:51211 kubectl port-forward svc/haproxy-node2-svc -n "${SOLO_NAMESPACE}" 52211:50211 & # node3 grpc port accessed by localhost:52211 kubectl port-forward svc/haproxy-node3-svc -n "${SOLO_NAMESPACE}" 53211:50211 & - Envoy Proxy:
envoy-proxy-<node name>-svc# enable port forwarding for envoy proxy kubectl port-forward svc/envoy-proxy-node1-svc -n "${SOLO_NAMESPACE}" 8181:8080 & kubectl port-forward svc/envoy-proxy-node2-svc -n "${SOLO_NAMESPACE}" 8281:8080 & kubectl port-forward svc/envoy-proxy-node3-svc -n "${SOLO_NAMESPACE}" 8381:8080 & - Hiero explorer:
solo-deployment-hiero-explorer# enable port forwarding for hiero explorer, can be access at http://localhost:8080/ # check to see if it is already enabled, port forwarding for explorer should be handled by solo automatically # kubectl port-forward svc/hiero-explorer-1 -n "${SOLO_NAMESPACE}" 8080:8080 & - JSON RPC Relays
You can deploy JSON RPC Relays for one or more nodes as below:
# deploy relay node first
solo relay node add -i node1 --deployment "${SOLO_DEPLOYMENT}"

# enable relay for node1
# check to see if it is already enabled, port forwarding for relay should be handled by solo automatically
# kubectl port-forward svc/relay-1 -n "${SOLO_NAMESPACE}" 7546:7546 &
13 - Attach JVM Debugger and Retrieve Logs
This document describes how to attach a JVM debugger to a running Hiero Consensus Node and retrieve logs for debugging purposes. It also provides instructions on how to save and reuse network state files.
How to Debug a Hiero Consensus Node
1. Using k9s to access running consensus node logs
Running the command k9s -A in terminal, and select one of the network nodes:
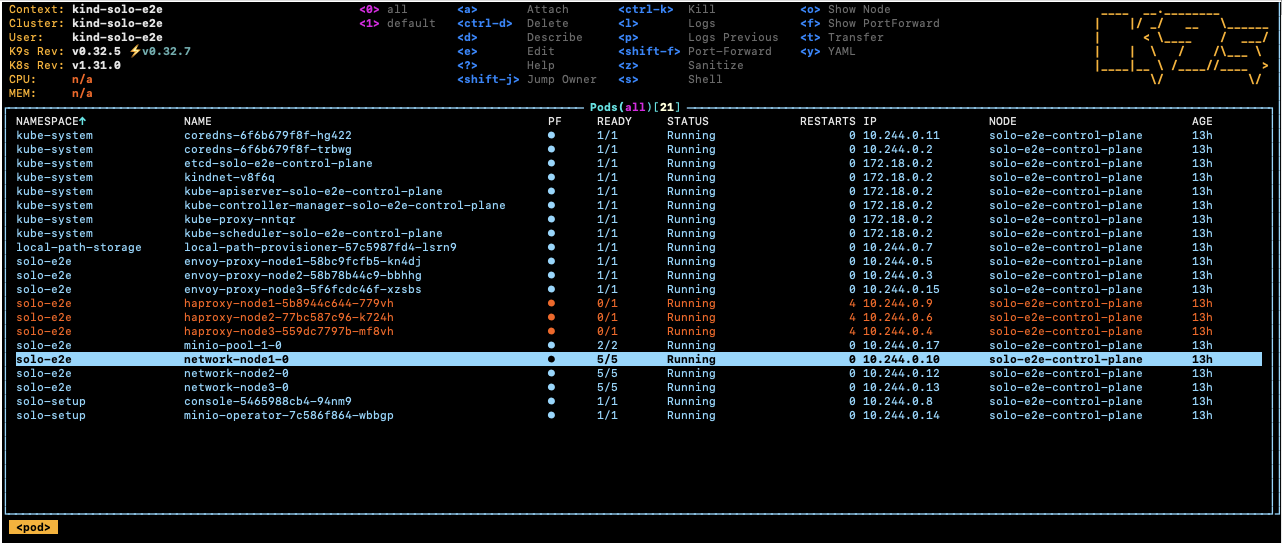
Next, select the root-container and press the key s to enter the shell of the container.
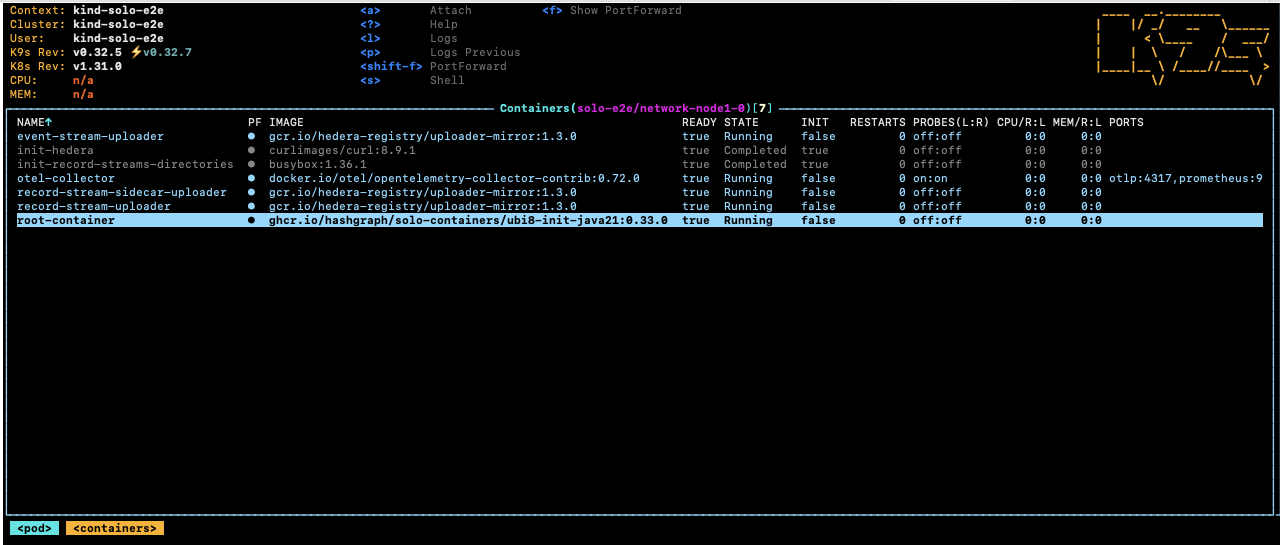
Once inside the shell, you can change to directory cd /opt/hgcapp/services-hedera/HapiApp2.0/
to view all hedera related logs and properties files.
[root@network-node1-0 hgcapp]# cd /opt/hgcapp/services-hedera/HapiApp2.0/
[root@network-node1-0 HapiApp2.0]# pwd
/opt/hgcapp/services-hedera/HapiApp2.0
[root@network-node1-0 HapiApp2.0]# ls -ltr data/config/
total 0
lrwxrwxrwx 1 root root 27 Dec  4 02:05 bootstrap.properties -> ..data/bootstrap.properties
lrwxrwxrwx 1 root root 29 Dec  4 02:05 application.properties -> ..data/application.properties
lrwxrwxrwx 1 root root 32 Dec  4 02:05 api-permission.properties -> ..data/api-permission.properties
[root@network-node1-0 HapiApp2.0]# ls -ltr output/
total 1148
-rw-r--r-- 1 hedera hedera       0 Dec  4 02:06 hgcaa.log
-rw-r--r-- 1 hedera hedera       0 Dec  4 02:06 queries.log
drwxr-xr-x 2 hedera hedera    4096 Dec  4 02:06 transaction-state
drwxr-xr-x 2 hedera hedera    4096 Dec  4 02:06 state
-rw-r--r-- 1 hedera hedera     190 Dec  4 02:06 swirlds-vmap.log
drwxr-xr-x 2 hedera hedera    4096 Dec  4 16:01 swirlds-hashstream
-rw-r--r-- 1 hedera hedera 1151446 Dec  4 16:07 swirlds.log
Alternatively, you can use the following command to download hgcaa.log and swirlds.log for further analysis.
# download logs as zip file from node1 and save in default ~/.solo/logs/<namespace>/<timestamp/
solo consensus diagnostics all --deployment solo-deployment
2. Using IntelliJ remote debug with Solo
NOTE: the hiero-consensus-node path referenced ‘../hiero-consensus-node/hedera-node/data’ may need to be updated based on what directory you are currently in. This also assumes that you have done an assemble/build and the directory contents are up-to-date.
Set up an Intellij run/debug configuration for remote JVM debug as shown in the below screenshot:
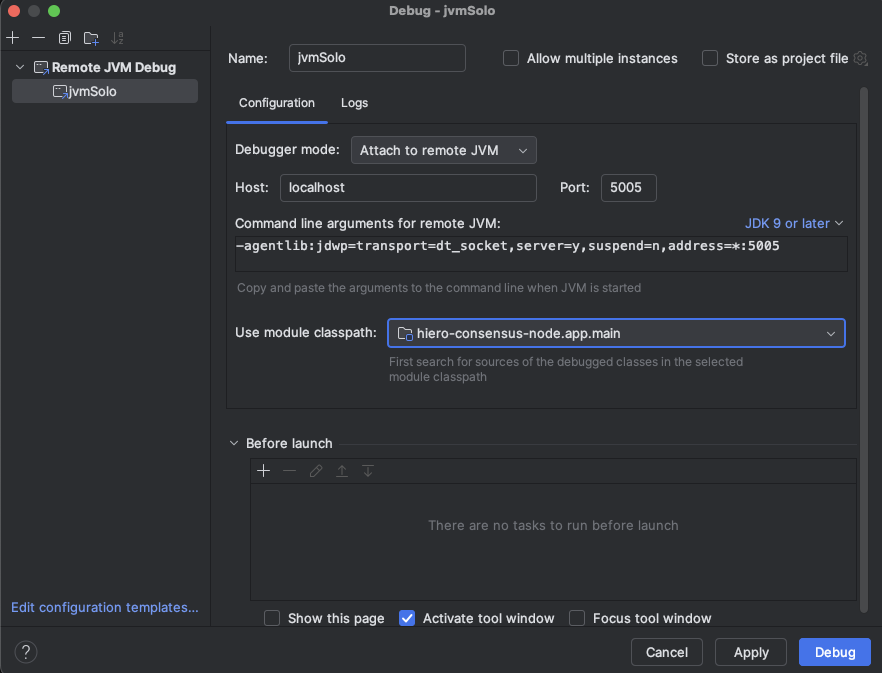
If you are working on a Hiero Consensus Node testing application, you should use the following configuration in Intellij:
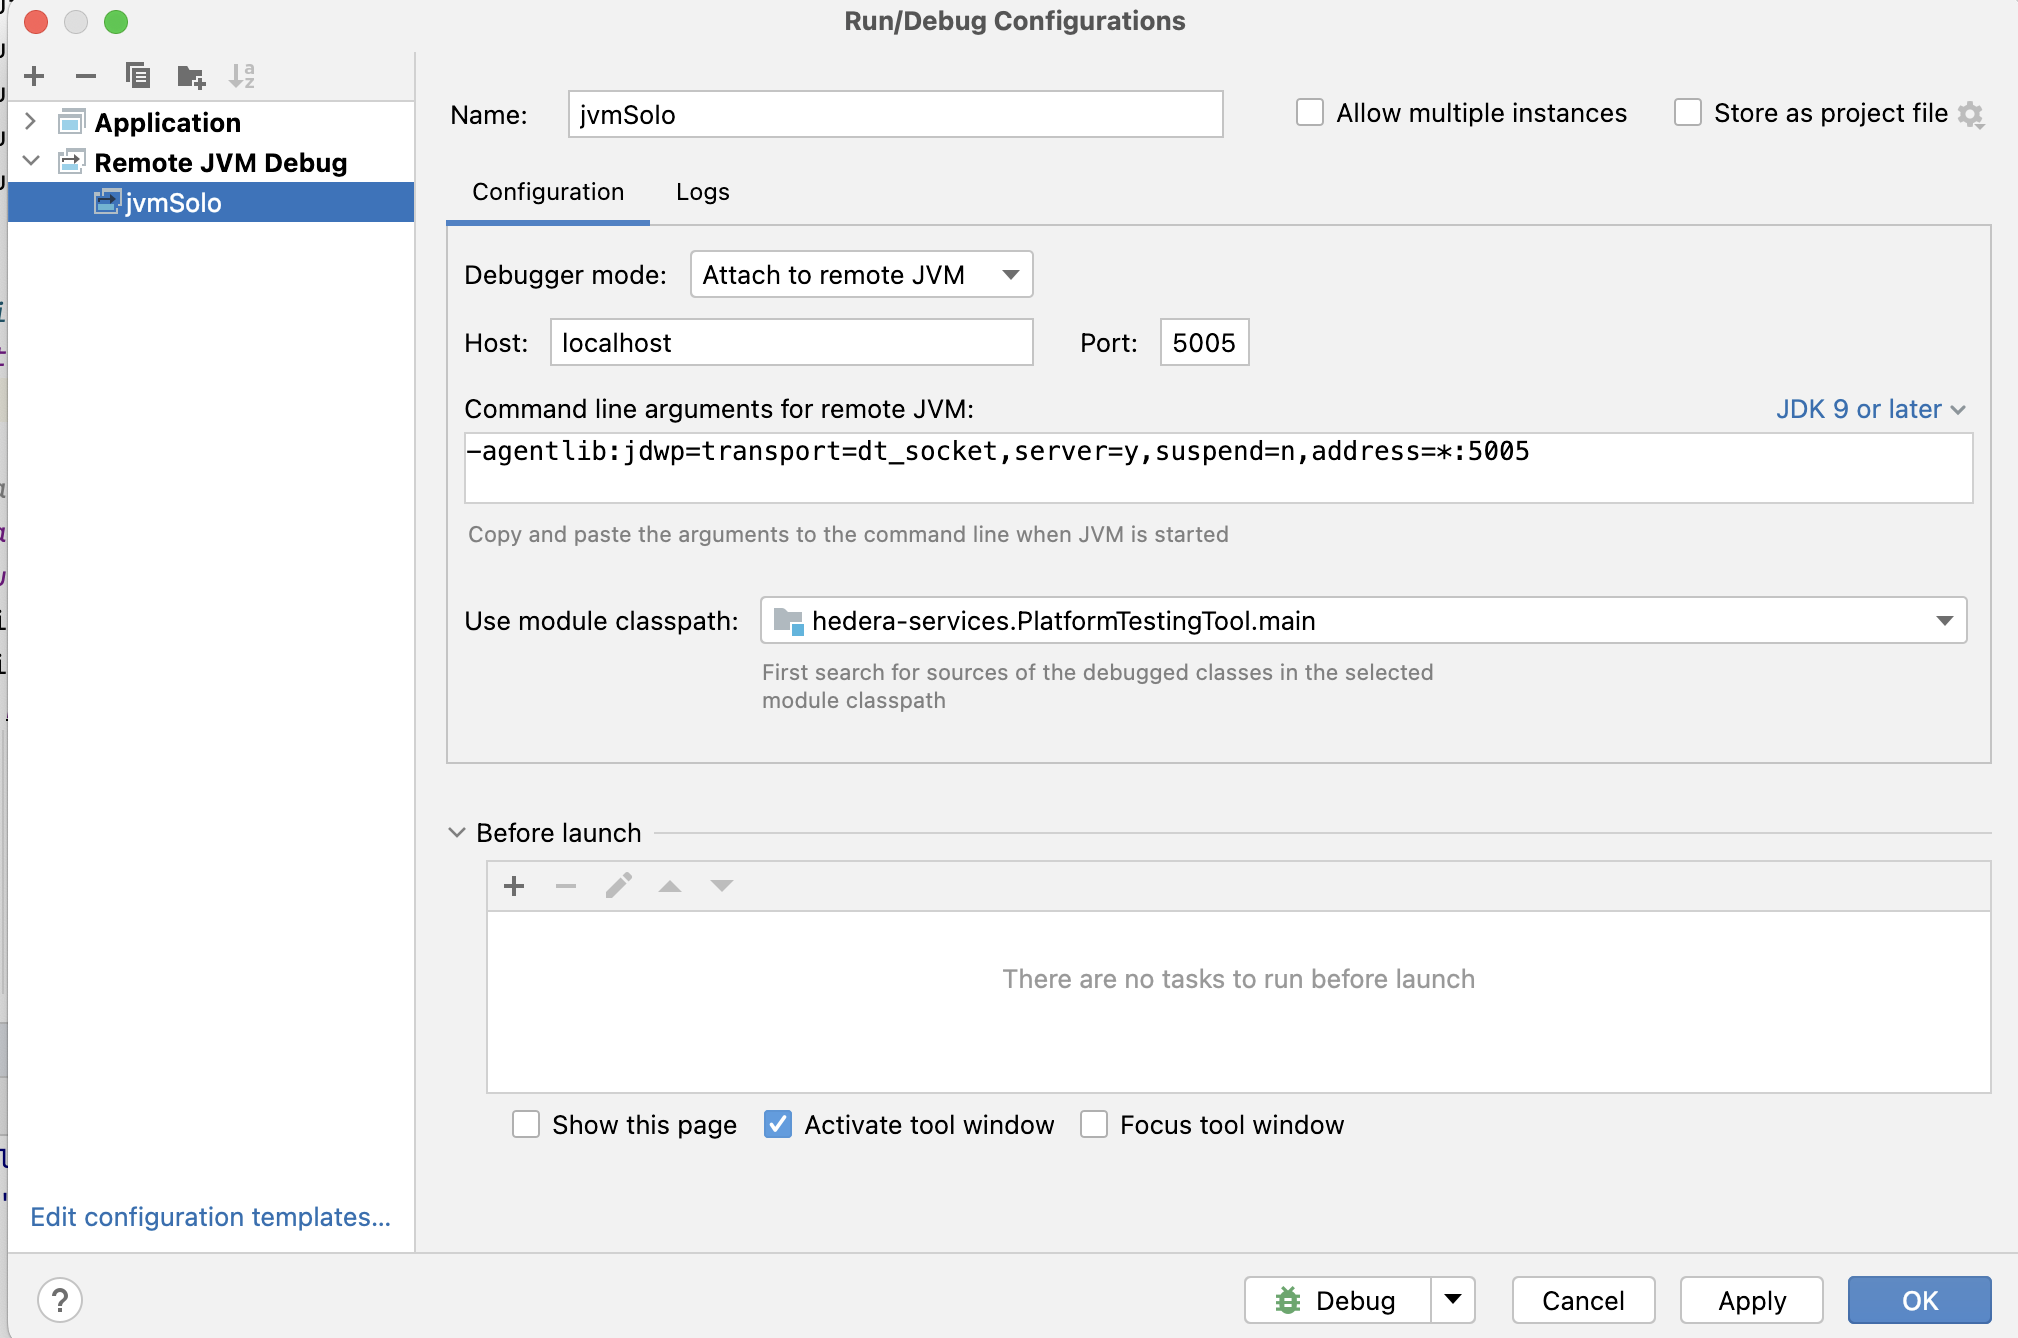
Set up a breakpoint if necessary.
From Solo repo directory, run the following command from a terminal to launch a three node network, assume we are trying to attach debug to node2.
Make sure the path following local-build-path points to the correct directory.
Example 1: attach jvm debugger to a Hiero Consensus Node
SOLO_CLUSTER_NAME=solo-cluster
SOLO_NAMESPACE=solo-e2e
SOLO_CLUSTER_SETUP_NAMESPACE=solo-setup
SOLO_DEPLOYMENT=solo-deployment

rm -Rf ~/.solo # to avoid name collision issues if you ran previously with the same deployment name
kind delete cluster -n "${SOLO_CLUSTER_NAME}"
kind create cluster -n "${SOLO_CLUSTER_NAME}"
solo init
solo cluster-ref config setup -s "${SOLO_CLUSTER_SETUP_NAMESPACE}"

solo cluster-ref config connect --cluster-ref ${SOLO_CLUSTER_NAME} --context kind-${SOLO_CLUSTER_NAME}
solo deployment config create --namespace "${SOLO_NAMESPACE}" --deployment "${SOLO_DEPLOYMENT}"
solo deployment cluster attach --deployment "${SOLO_DEPLOYMENT}" --cluster-ref ${SOLO_CLUSTER_NAME} --num-consensus-nodes 3
solo keys consensus generate --deployment "${SOLO_DEPLOYMENT}" --gossip-keys --tls-keys -i node1,node2,node3

solo consensus network deploy --deployment "${SOLO_DEPLOYMENT}" -i node1,node2,node3 --debug-node-alias node2
solo consensus node setup --deployment "${SOLO_DEPLOYMENT}" -i node1,node2,node3 --local-build-path ../hiero-consensus-node/hedera-node/data
solo consensus node start --deployment "${SOLO_DEPLOYMENT}" -i node1,node2,node3 --debug-node-alias node2
Once you see the following message, you can launch the JVM debugger from Intellij
❯ Check all nodes are ACTIVE
  Check node: node1,
  Check node: node2,  Please attach JVM debugger now.
  Check node: node3,
? JVM debugger setup for node2. Continue when debugging is complete? (y/N)
The Hiero Consensus Node application should stop at the breakpoint you set:
After done with debugging, continue to run the application from Intellij. Then select y to continue the Solo command line operation.
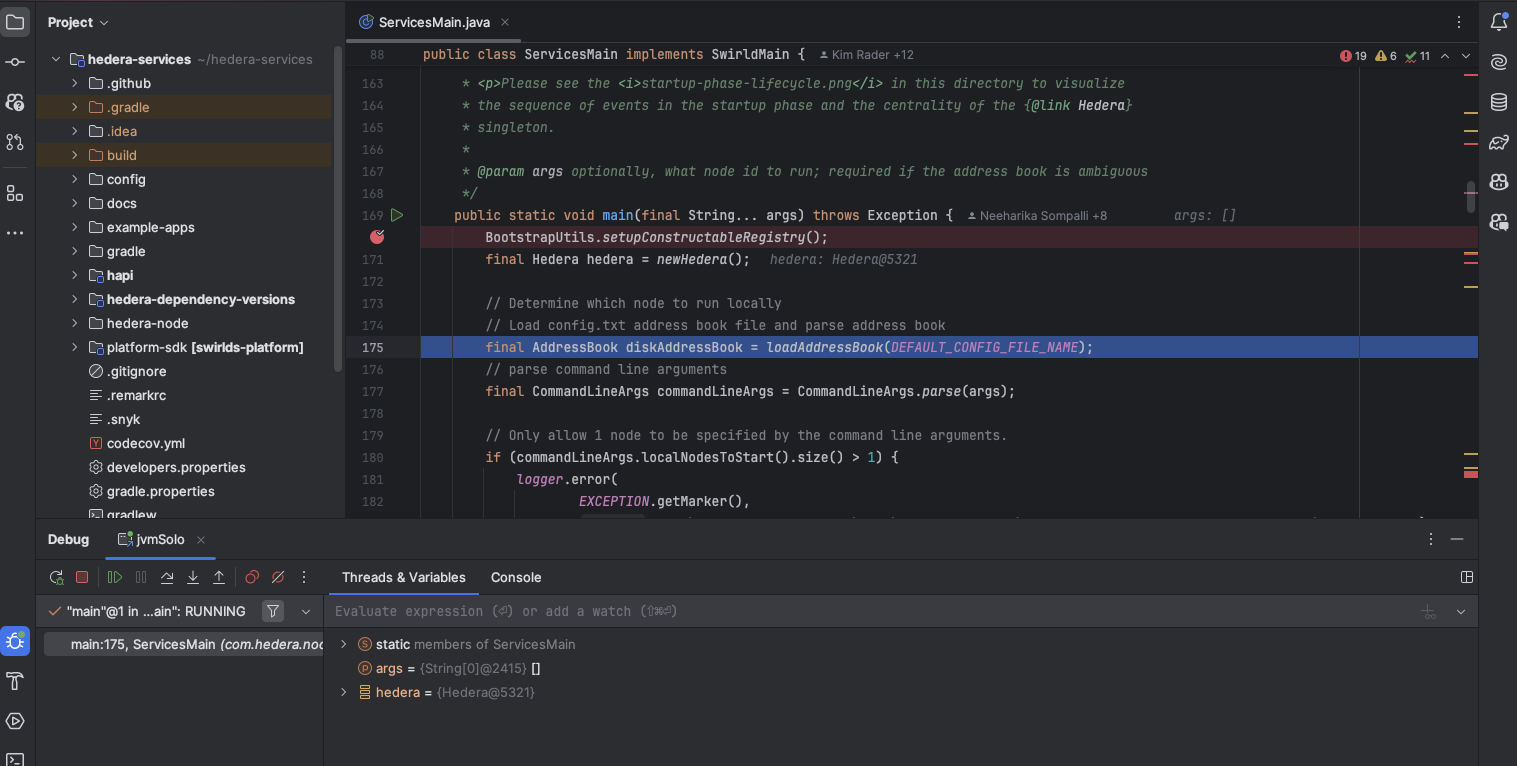

Example 2: attach a JVM debugger with the consensus node add operation
SOLO_CLUSTER_NAME=solo-cluster
SOLO_NAMESPACE=solo-e2e
SOLO_CLUSTER_SETUP_NAMESPACE=solo-setup
SOLO_DEPLOYMENT=solo-deployment

rm -Rf ~/.solo
kind delete cluster -n "${SOLO_CLUSTER_NAME}"
kind create cluster -n "${SOLO_CLUSTER_NAME}"
solo init
solo cluster-ref config setup -s "${SOLO_CLUSTER_SETUP_NAMESPACE}"

solo cluster-ref config connect --cluster-ref ${SOLO_CLUSTER_NAME} --context kind-${SOLO_CLUSTER_NAME}
solo deployment config create --namespace "${SOLO_NAMESPACE}" --deployment "${SOLO_DEPLOYMENT}"
solo deployment cluster attach --deployment "${SOLO_DEPLOYMENT}" --cluster-ref ${SOLO_CLUSTER_NAME} --num-consensus-nodes 3
solo keys consensus generate --deployment "${SOLO_DEPLOYMENT}" --gossip-keys --tls-keys -i node1,node2,node3

solo consensus network deploy --deployment "${SOLO_DEPLOYMENT}" -i node1,node2,node3 --pvcs true
solo consensus node setup --deployment "${SOLO_DEPLOYMENT}" -i node1,node2,node3 --local-build-path ../hiero-consensus-node/hedera-node/data
solo consensus node start --deployment "${SOLO_DEPLOYMENT}" -i node1,node2,node3

solo consensus node add --deployment "${SOLO_DEPLOYMENT}" --gossip-keys --tls-keys --debug-node-alias node4 --local-build-path ../hiero-consensus-node/hedera-node/data --pvcs true
Example 3: attach a JVM debugger with the consensus node update operation
SOLO_CLUSTER_NAME=solo-cluster
SOLO_NAMESPACE=solo-e2e
SOLO_CLUSTER_SETUP_NAMESPACE=solo-setup
SOLO_DEPLOYMENT=solo-deployment

rm -Rf ~/.solo
kind delete cluster -n "${SOLO_CLUSTER_NAME}"
kind create cluster -n "${SOLO_CLUSTER_NAME}"
solo init
solo cluster-ref config setup -s "${SOLO_CLUSTER_SETUP_NAMESPACE}"

solo cluster-ref config connect --cluster-ref ${SOLO_CLUSTER_NAME} --context kind-${SOLO_CLUSTER_NAME}
solo deployment config create --namespace "${SOLO_NAMESPACE}" --deployment "${SOLO_DEPLOYMENT}"
solo deployment cluster attach --deployment "${SOLO_DEPLOYMENT}" --cluster-ref ${SOLO_CLUSTER_NAME} --num-consensus-nodes 3
solo keys consensus generate --deployment "${SOLO_DEPLOYMENT}" --gossip-keys --tls-keys -i node1,node2,node3

solo consensus network deploy --deployment "${SOLO_DEPLOYMENT}" -i node1,node2,node3
solo consensus node setup --deployment "${SOLO_DEPLOYMENT}" -i node1,node2,node3 --local-build-path ../hiero-consensus-node/hedera-node/data
solo consensus node start --deployment "${SOLO_DEPLOYMENT}" -i node1,node2,node3

solo consensus node update --deployment "${SOLO_DEPLOYMENT}" --node-alias node2  --debug-node-alias node2 --local-build-path ../hiero-consensus-node/hedera-node/data --new-account-number 0.0.7 --gossip-public-key ./s-public-node2.pem --gossip-private-key ./s-private-node2.pem --release-tag v0.59.5
Example 4: attach a JVM debugger with the node delete operation
SOLO_CLUSTER_NAME=solo-cluster
SOLO_NAMESPACE=solo-e2e
SOLO_CLUSTER_SETUP_NAMESPACE=solo-setup
SOLO_DEPLOYMENT=solo-deployment

rm -Rf ~/.solo
kind delete cluster -n "${SOLO_CLUSTER_NAME}"
kind create cluster -n "${SOLO_CLUSTER_NAME}"
solo init
solo cluster-ref config setup -s "${SOLO_CLUSTER_SETUP_NAMESPACE}"

solo cluster-ref config connect --cluster-ref ${SOLO_CLUSTER_NAME} --context kind-${SOLO_CLUSTER_NAME}
solo deployment config create --namespace "${SOLO_NAMESPACE}" --deployment "${SOLO_DEPLOYMENT}"
solo deployment cluster attach --deployment "${SOLO_DEPLOYMENT}" --cluster-ref ${SOLO_CLUSTER_NAME} --num-consensus-nodes 3
solo keys consensus generate --deployment "${SOLO_DEPLOYMENT}" --gossip-keys --tls-keys -i node1,node2,node3

solo consensus network deploy --deployment "${SOLO_DEPLOYMENT}" -i node1,node2,node3
solo consensus node setup --deployment "${SOLO_DEPLOYMENT}" -i node1,node2,node3 --local-build-path ../hiero-consensus-node/hedera-node/data
solo consensus node start --deployment "${SOLO_DEPLOYMENT}" -i node1,node2,node3

solo consensus node destroy --deployment "${SOLO_DEPLOYMENT}" --node-alias node2  --debug-node-alias node3 --local-build-path ../hiero-consensus-node/hedera-node/data
3. Save and reuse network state files
With the following command you can save the network state to a file.
# must stop hedera node operation first
solo consensus node stop --deployment "${SOLO_DEPLOYMENT}"

# download state file to default location at ~/.solo/logs/<namespace>
solo consensus state download -i node1,node2,node3 --deployment "${SOLO_DEPLOYMENT}"
By default, the state files are saved under ~/.solo directory
└── logs
    ├── solo-e2e
    │   ├── network-node1-0-state.zip
    │   └── network-node2-0-state.zip
    └── solo.log
Later, user can use the following command to upload the state files to the network and restart Hiero Consensus Nodes.
SOLO_CLUSTER_NAME=solo-cluster
SOLO_NAMESPACE=solo-e2e
SOLO_CLUSTER_SETUP_NAMESPACE=solo-setup
SOLO_DEPLOYMENT=solo-deployment

rm -Rf ~/.solo
kind delete cluster -n "${SOLO_CLUSTER_NAME}"
kind create cluster -n "${SOLO_CLUSTER_NAME}"
solo init
solo cluster-ref config setup -s "${SOLO_CLUSTER_SETUP_NAMESPACE}"

solo cluster-ref config connect --cluster-ref ${SOLO_CLUSTER_NAME} --context kind-${SOLO_CLUSTER_NAME}
solo deployment config create --namespace "${SOLO_NAMESPACE}" --deployment "${SOLO_DEPLOYMENT}"
solo deployment cluster attach --deployment "${SOLO_DEPLOYMENT}" --cluster-ref ${SOLO_CLUSTER_NAME} --num-consensus-nodes 3
solo keys consensus generate --deployment "${SOLO_DEPLOYMENT}" --gossip-keys --tls-keys -i node1,node2,node3

solo consensus network deploy --deployment "${SOLO_DEPLOYMENT}" -i node1,node2,node3
solo consensus node setup --deployment "${SOLO_DEPLOYMENT}" -i node1,node2,node3 --local-build-path ../hiero-consensus-node/hedera-node/data
solo consensus node start --deployment "${SOLO_DEPLOYMENT}" -i node1,node2,node3
solo consensus node stop --deployment "${SOLO_DEPLOYMENT}"

solo consensus node states -i node1,node2,node3 --deployment "${SOLO_DEPLOYMENT}"

# start network with pre-existing state files
solo consensus node start --deployment "${SOLO_DEPLOYMENT}" --state-file network-node1-0-state.zip
14 - Using Network Load Generator with Solo
This document describes how to use Network Load Generator with Solo.
Using Network Load Generator with Solo
The Network Load Generator (NLG) is a benchmarking tool designed to stress test Hiero networks by generating configurable transaction loads. To use the Network Load Generator with Solo, follow these steps:
- Create a Solo network:
npx @hashgraph/solo:@latest one-shot single deploy
- Use the
rapid-firecommands to install the NLG chart and start a load test:
@hashgraph/solo:@latest rapid-fire load start --deployment my-deployment --args '"-c 3 -a 10 -t 60"' --test CryptoTransferLoadTest
- In a separate terminal, you can start a different load test:
@hashgraph/solo:@latest rapid-fire load start --deployment my-deployment --args '"-c 3 -a 10 -t 60"' --test NftTransferLoadTest
- To stop the load test early use the
stopcommand:
@hashgraph/solo:@latest rapid-fire load stop --deployment my-deployment --test CryptoTransferLoadTest
- To stop all running load tests and uninstall the NLG chart, use the
destroycommand:
@hashgraph/solo:@latest rapid-fire destroy all --deployment my-deployment
See this example for more details: examples/rapid-fire/
A full list of all available rapid-fire commands can be found in Solo CLI Commands
Test names and arguments
For a detailed list of all available tests and their arguments, refer to the Network Load Generator documentation
15 - Using Environment Variables
Environment variables are used to customize the behavior of Solo. This document provides a list of environment variables that can be configured to change the default behavior.
Environment Variables Used in Solo
User can configure the following environment variables to customize the behavior of Solo.
Table of environment variables
| Environment Variable | Description | Default Value |
|---|---|---|
SOLO_HOME | Path to the Solo cache and log files | ~/.solo |
SOLO_CACHE_DIR | Path to the Solo cache directory | ~/.solo/cache |
SOLO_LOG_LEVEL | Logging level for Solo operations (trace, debug, info, warn, error) | info |
SOLO_DEV_OUTPUT | Treat all commands as if the –dev flag were specified | false |
SOLO_CHAIN_ID | Chain id of solo network | 298 |
DEFAULT_START_ID_NUMBER | First node account ID of solo test network | 0.0.3 |
SOLO_NODE_INTERNAL_GOSSIP_PORT | Internal gossip port number used by hedera network | 50111 |
SOLO_NODE_EXTERNAL_GOSSIP_PORT | External port number used by hedera network | 50111 |
SOLO_NODE_DEFAULT_STAKE_AMOUNT | Default stake amount for node | 500 |
SOLO_OPERATOR_ID | Operator account ID for solo network | 0.0.2 |
SOLO_OPERATOR_KEY | Operator private key for solo network | 302e020100300506032b65700422042091132178e72057a1d7528025956fe39b0b847f200ab59b2fdd367017f3087137 |
SOLO_OPERATOR_PUBLIC_KEY | Operator public key for solo network | 302a300506032b65700321000aa8e21064c61eab86e2a9c164565b4e7a9a4146106e0a6cd03a8c395a110e92 |
FREEZE_ADMIN_ACCOUNT | Freeze admin account ID for solo network | 0.0.58 |
GENESIS_KEY | Genesis private key for solo network | 302e020100300506032b65700422042091132178e72057a1d7528025956fe39b0b847f200ab59b2fdd367017f3087137 |
LOCAL_NODE_START_PORT | Local node start port for solo network | 30212 |
NODE_CLIENT_MIN_BACKOFF | The minimum amount of time to wait between retries. | 1000 |
NODE_CLIENT_MAX_BACKOFF | The maximum amount of time to wait between retries. | 1000 |
NODE_CLIENT_REQUEST_TIMEOUT | The period of time a transaction or query request will retry from a “busy” network response | 600000 |
NODE_COPY_CONCURRENT | The number of concurrent threads to use when copying files to the node. | 4 |
PODS_RUNNING_MAX_ATTEMPTS | The maximum number of attempts to check if pods are running. | 900 |
PODS_RUNNING_DELAY | The interval between attempts to check if pods are running, in the unit of milliseconds. | 1000 |
NETWORK_NODE_ACTIVE_MAX_ATTEMPTS | The maximum number of attempts to check if network nodes are active. | 300 |
NETWORK_NODE_ACTIVE_DELAY | The interval between attempts to check if network nodes are active, in the unit of milliseconds. | 1000 |
NETWORK_NODE_ACTIVE_TIMEOUT | The period of time to wait for network nodes to become active, in the unit of milliseconds. | 1000 |
NETWORK_PROXY_MAX_ATTEMPTS | The maximum number of attempts to check if network proxy is running. | 300 |
NETWORK_PROXY_DELAY | The interval between attempts to check if network proxy is running, in the unit of milliseconds. | 2000 |
BLOCK_NODE_ACTIVE_MAX_ATTEMPTS | The maximum number of attempts to check if block nodes are active. | 100 |
BLOCK_NODE_ACTIVE_DELAY | The interval between attempts to check if block nodes are active, in the unit of milliseconds. | 60 |
BLOCK_NODE_ACTIVE_TIMEOUT | The period of time to wait for block nodes to become active, in the unit of milliseconds. | 60 |
PODS_READY_MAX_ATTEMPTS | The maximum number of attempts to check if pods are ready. | 300 |
PODS_READY_DELAY | The interval between attempts to check if pods are ready, in the unit of milliseconds. | 2000 |
RELAY_PODS_RUNNING_MAX_ATTEMPTS | The maximum number of attempts to check if relay pods are running. | 900 |
RELAY_PODS_RUNNING_DELAY | The interval between attempts to check if relay pods are running, in the unit of milliseconds. | 1000 |
RELAY_PODS_READY_MAX_ATTEMPTS | The maximum number of attempts to check if relay pods are ready. | 100 |
RELAY_PODS_READY_DELAY | The interval between attempts to check if relay pods are ready, in the unit of milliseconds. | 1000 |
NETWORK_DESTROY_WAIT_TIMEOUT | The period of time to wait for network to be destroyed, in the unit of milliseconds. | 120 |
SOLO_LEASE_ACQUIRE_ATTEMPTS | The number of attempts to acquire a lock before failing. | 10 |
SOLO_LEASE_DURATION | The default duration in seconds for which a lock is held before expiration. | 20 |
ACCOUNT_UPDATE_BATCH_SIZE | The number of accounts to update in a single batch operation. | 10 |
NODE_CLIENT_PING_INTERVAL | The interval in milliseconds between node health pings. | 30000 |
NODE_CLIENT_SDK_PING_MAX_RETRIES | The maximum number of retries for node health pings. | 5 |
NODE_CLIENT_SDK_PING_RETRY_INTERVAL | The interval in milliseconds between node health ping retries. | 10000 |
GRPC_PORT | The gRPC port used for local node communication. | 50211 |
LOCAL_BUILD_COPY_RETRY | The number of times to retry local build copy operations. | 3 |
LOAD_BALANCER_CHECK_DELAY_SECS | The delay in seconds between load balancer status checks. | 5 |
LOAD_BALANCER_CHECK_MAX_ATTEMPTS | The maximum number of attempts to check load balancer status. | 60 |
JSON_RPC_RELAY_CHART_URL | The URL for the JSON-RPC relay Helm chart repository. | https://hiero-ledger.github.io/hiero-json-rpc-relay/charts |
MIRROR_NODE_CHART_URL | The URL for the Hedera mirror node Helm chart repository. | https://hashgraph.github.io/hedera-mirror-node/charts |
NODE_CLIENT_MAX_ATTEMPTS | The maximum number of attempts for node client operations. | 600 |
EXPLORER_CHART_URL | The URL for the Hedera Explorer Helm chart repository. | oci://ghcr.io/hiero-ledger/hiero-mirror-node-explorer/hiero-explorer-chart |
INGRESS_CONTROLLER_CHART_URL | The URL for the ingress controller Helm chart repository. | https://haproxy-ingress.github.io/charts |
BLOCK_NODE_VERSION | The release version of the block node to use. | v0.18.0 |
CONSENSUS_NODE_VERSION | The release version of the consensus node to use. | v0.65.1 |
SOLO_CHART_VERSION | The release version of the Solo charts to use. | v0.56.0 |
MIRROR_NODE_VERSION | The release version of the mirror node to use. | v0.138.0 |
EXPLORER_VERSION | The release version of the explorer to use. | v25.1.1 |
RELAY_VERSION | The release version of the JSON RPC Relay to use. | v0.70.0 |
INGRESS_CONTROLLER_VERSION | The release version of the consensus node to use. | v0.14.5 |
MINIO_OPERATOR_VERSION | The release version of the MinIO Operator to use. | 7.1.1 |
PROMETHEUS_STACK_VERSION | The release version of the Prometheus Stack to use. | 52.0.1 |
GRAFANA_AGENT_VERSION | The release version of the Grafana Agent to use. | 0.27.1 |
ONE_SHOT_WITH_BLOCK_NODE | If one-shot should deploy with block node. | false |
MIRROR_NODE_PINGER_TPS | The transactions per second to set the Mirror Node monitor pinger to, 0 means disable. | 5 |
NETWORK_LOAD_GENERATOR_CHART_URL | The url for the NLG chart | oci://swirldslabs.jfrog.io/load-generator-helm-release-local |
NETWORK_LOAD_GENERATOR_PODS_RUNNING_MAX_ATTEMPTS | The maximum number of attempts to check NLG status. | 900 |
NETWORK_LOAD_GENERATOR_POD_RUNNING_DELAY | The interval between attempts to check if nlg pod is running, in the unit of milliseconds. | 1000 |
NETWORK_LOAD_GENERATOR_CHART_VERSION | The release version of the NLG chart to use. | v0.7.0 |
BLOCK_STREAM_STREAM_MODE | The blockStream.streamMode for consensus node’s application-properties, used only when block node is deployed. | BOTH |
BLOCK_STREAM_WRITER_MODE | The blockStream.writerMode for consensus node’s application-properties, used only when block node is deployed. | FILE_AND_GRPC |
FORCE_PODMAN | Force the use of Podman as the container engine when creating a new local cluster. Values: “true” / “false” | false |
PROMETHEUS_OPERATOR_CRDS_CHART_URL | The URL for the prometheus oprator chart repository for the CRDs | https://prometheus-community.github.io/helm-charts |
16 - Solo CI Workflow
This document describes how to use Solo in CI.
This guide walks you through setting up and deploying a Solo network in a continuous integration (CI) environment. You’ll verify that your runner meets Docker resource requirements, install the necessary dependencies, and deploy Solo to a local cluster.
Step 1: Verify Runner and Docker Resources
You can use GitHub runners or self-hosted runners to deploy Solo.
Minimum Requirements
- 6 CPU cores
- 12 GB of memory
If these requirements aren’t met, some Solo components may hang or fail to install during deployment.
NOTE: The Kubernetes cluster will never get full access to the memory available to the host. So, even though we say that 12 GB Memory is a requirement, that is a host requirement, and Solo would be limited to a percentage of the 12 GB limit. If the host is Docker, then setting Docker to 12 GB of memory, would limit the Kubernetes cluster deployed possibly by Kind (Kubernetes-in-Docker) to less than 12 GB of memory. Furthermore, the longer Solo runs, and as the transaction load increases, so will its CPU and memory utilization. These minimum requirements should work with solo one-shot single deploy as documented here.
Check Docker Resources
Add the following step to your workflow to verify your Docker environment:
  - name: Check Docker Resources
    run: |
      read cpus mem <<<"$(docker info --format '{{.NCPU}} {{.MemTotal}}')"
      mem_gb=$(awk -v m="$mem" 'BEGIN{printf "%.1f", m/1000000000}')
      echo "CPU cores: $cpus"
      echo "Memory: ${mem_gb} GB"
Expected Output: CPU cores: 6 Memory: 12 GB
Step 2: Set Up Kind
Next, install Kind to create and manage a local Kubernetes cluster in your workflow.
  - name: Setup Kind
    uses: helm/kind-action@a1b0e391336a6ee6713a0583f8c6240d70863de3
    with:
      install_only: true
      node_image: kindest/node:v1.31.4@sha256:2cb39f7295fe7eafee0842b1052a599a4fb0f8bcf3f83d96c7f4864c357c6c30
      version: v0.26.0
      kubectl_version: v1.31.4
      verbosity: 3
      wait: 120s
Step 3: Install Node.js
  - name: Set up Node.js
    uses: actions/setup-node@49933ea5288caeca8642d1e84afbd3f7d6820020
    with:
      node-version: 22.12.0
Step 4: Install Solo CLI
Install the Solo CLI globally using npm. Always pin the version to avoid unexpected workflow failures caused by breaking changes in newer CLI releases.
  - name: Install Solo CLI
    run: |
      set -euo pipefail
      npm install -g @hashgraph/solo@0.48.0
      solo --version
      kind --version
Step 5: Deploy Solo
Deploy a Solo network to your Kind cluster. This creates and configures a fully functional local Hedera network including consensus node, mirror node, mirror node explorer and JSON RPC Relay.
  - name: Deploy Solo
    env:
      SOLO_CLUSTER_NAME: solo
      SOLO_NAMESPACE: solo
      SOLO_CLUSTER_SETUP_NAMESPACE: solo-cluster
      SOLO_DEPLOYMENT: solo-deployment
    run: |
      set -euo pipefail
      kind create cluster -n "${SOLO_CLUSTER_NAME}"
      solo one-shot single deploy | tee solo-deploy.log
Complete Example Workflow
Here’s the full workflow combining all the steps above:
  - name: Check Docker Resources
    run: |
      read cpus mem <<<"$(docker info --format '{{.NCPU}} {{.MemTotal}}')"
      mem_gb=$(awk -v m="$mem" 'BEGIN{printf "%.1f", m/1000000000}')
      echo "CPU cores: $cpus"
      echo "Memory: ${mem_gb} GB"

  - name: Setup Kind
    uses: helm/kind-action@a1b0e391336a6ee6713a0583f8c6240d70863de3
    with:
      install_only: true
      node_image: kindest/node:v1.31.4@sha256:2cb39f7295fe7eafee0842b1052a599a4fb0f8bcf3f83d96c7f4864c357c6c30
      version: v0.26.0
      kubectl_version: v1.31.4
      verbosity: 3
      wait: 120s

  - name: Set up Node.js
    uses: actions/setup-node@49933ea5288caeca8642d1e84afbd3f7d6820020
    with:
      node-version: 22.12.0

  - name: Install Solo CLI
    run: |
      set -euo pipefail
      npm install -g @hashgraph/solo@0.48.0
      solo --version
      kind --version

  - name: Deploy Solo
    env:
      SOLO_CLUSTER_NAME: solo
      SOLO_NAMESPACE: solo
      SOLO_CLUSTER_SETUP_NAMESPACE: solo-cluster
      SOLO_DEPLOYMENT: solo-deployment
    run: |
      set -euo pipefail
      kind create cluster -n "${SOLO_CLUSTER_NAME}"
      solo one-shot single deploy | tee solo-deploy.log
17 -
Legacy Releases
| Solo Version | Node.js | Kind | Solo Chart | Hedera | Kubernetes | Kubectl | Helm | k9s | Docker Resources | Release Date | End of Support |
|---|---|---|---|---|---|---|---|---|---|---|---|
| 0.51.0 | >= 22.0.0 (lts/jod) | >= v0.26.0 | v0.58.1 | v0.66.0+ | >= v1.27.3 | >= v1.27.3 | v3.14.2 | >= v0.27.4 | Memory >= 12GB, CPU cores >= 6 | 2025-12-05 | 2026-01-05 |
| 0.49.0 | >= 22.0.0 (lts/jod) | >= v0.26.0 | v0.57.0 | v0.66.0+ | >= v1.27.3 | >= v1.27.3 | v3.14.2 | >= v0.27.4 | Memory >= 12GB, CPU cores >= 6 | 2025-11-06 | 2025-12-06 |
| 0.47.0 | >= 22.0.0 (lts/jod) | >= v0.26.0 | v0.56.0 | v0.66.0+ | >= v1.27.3 | >= v1.27.3 | v3.14.2 | >= v0.27.4 | Memory >= 12GB, CPU cores >= 6 | 2025-10-16 | 2025-11-16 |
| 0.46.0 (LTS) | >= 22.0.0 (lts/jod) | >= v0.26.0 | v0.56.0 | v0.65.1+ | >= v1.27.3 | >= v1.27.3 | v3.14.2 | >= v0.27.4 | Memory >= 12GB, CPU cores >= 6 | 2025-10-02 | 2026-01-02 |
| 0.45.0 | >= 22.0.0 (lts/jod) | >= v0.26.0 | v0.56.0 | v0.65.1+ | >= v1.27.3 | >= v1.27.3 | v3.14.2 | >= v0.27.4 | Memory >= 12GB, CPU cores >= 6 | 2025-09-24 | 2025-10-24 |
| 0.44.0 (LTS) | >= 22.0.0 (lts/jod) | >= v0.26.0 | v0.56.0 | v0.64.2+ | >= v1.27.3 | >= v1.27.3 | v3.14.2 | >= v0.27.4 | Memory >= 12GB, CPU cores >= 6 | 2025-09-16 | 2025-12-16 |
| 0.43.0 | >= 20.19.0 (lts/iron) | >= v0.26.0 | v0.54.5 | v0.63.9+ | >= v1.27.3 | >= v1.27.3 | v3.14.2 | >= v0.27.4 | Memory >= 12GB, CPU cores >= 6 | 2025-08-15 | 2025-09-15 |
| 0.42.0 (LTS) | >= 20.19.0 (lts/iron) | >= v0.26.0 | v0.54.5 | v0.63.9+ | >= v1.27.3 | >= v1.27.3 | v3.14.2 | >= v0.27.4 | Memory >= 12GB, CPU cores >= 6 | 2025-08-11 | 2025-11-11 |
| 0.41.0 | >= 20.19.0 (lts/iron) | >= v0.26.0 | v0.54.4 | v0.62.10+ | >= v1.27.3 | >= v1.27.3 | v3.14.2 | >= v0.27.4 | Memory >= 12GB, CPU cores >= 6 | 2025-07-24 | 2025-08-24 |
| 0.40.1 | >= 20.19.0 (lts/iron) | >= v0.26.0 | v0.54.4 | v0.61.7+ | >= v1.27.3 | >= v1.27.3 | v3.14.2 | >= v0.27.4 | Memory >= 12GB, CPU cores >= 6 | 2025-07-17 | 2025-08-17 |
| 0.40.0 | >= 20.19.0 (lts/iron) | >= v0.26.0 | v0.54.4 | v0.61.7+ | >= v1.27.3 | >= v1.27.3 | v3.14.2 | >= v0.27.4 | Memory >= 12GB, CPU cores >= 6 | 2025-07-16 | 2025-08-16 |
| 0.39.0 | >= 20.19.0 (lts/iron) | >= v0.26.0 | v0.54.3 | v0.61.7+ | >= v1.27.3 | >= v1.27.3 | v3.14.2 | >= v0.27.4 | Memory >= 12GB, CPU cores >= 6 | 2025-07-03 | 2025-08-03 |
| 0.38.0 | >= 20.19.0 (lts/iron) | >= v0.26.0 | v0.54.3 | v0.58.1+ | >= v1.27.3 | >= v1.27.3 | v3.14.2 | >= v0.27.4 | Memory >= 12GB, CPU cores >= 6 | 2025-06-26 | 2025-07-26 |
| 0.37.1 | >= 20.19.0 (lts/iron) | >= v0.26.0 | v0.53.0 | v0.58.1+ | >= v1.27.3 | >= v1.27.3 | v3.14.2 | >= v0.27.4 | Memory >= 12GB, CPU cores >= 6 | 2025-06-03 | 2025-07-03 |
| 0.37.0 | >= 20.19.0 (lts/iron) | >= v0.26.0 | v0.53.0 | v0.58.1+ | >= v1.27.3 | >= v1.27.3 | v3.14.2 | >= v0.27.4 | Memory >= 12GB, CPU cores >= 6 | 2025-06-02 | 2025-07-02 |
| 0.36.1 | >= 20.18.0 (lts/iron) | >= v0.26.0 | v0.53.0 | v0.58.1+ | >= v1.27.3 | >= v1.27.3 | v3.14.2 | >= v0.27.4 | Memory >= 12GB, CPU cores >= 6 | 2025-05-28 | 2025-06-28 |
| 0.36.0 | >= 20.18.0 (lts/iron) | >= v0.26.0 | v0.52.0 | v0.58.1+ | >= v1.27.3 | >= v1.27.3 | v3.14.2 | >= v0.27.4 | Memory >= 12GB, CPU cores >= 6 | 2025-05-23 | 2025-06-23 |
| 0.35.0 | >= 20.18.0 (lts/iron) | >= v0.26.0 | v0.44.0 | v0.58.1+ | >= v1.27.3 | >= v1.27.3 | v3.14.2 | >= v0.27.4 | Memory >= 12GB, CPU cores >= 6 | 2025-02-20 | 2025-03-20 |
| 0.34.0 | >= 20.18.0 (lts/iron) | >= v0.26.0 | v0.42.10 | v0.58.1+ | >= v1.27.3 | >= v1.27.3 | v3.14.2 | >= v0.27.4 | Memory >= 12GB, CPU cores >= 6 | 2025-01-24 | 2025-02-24 |
| 0.33.0 | >= 20.18.0 (lts/iron) | >= v0.26.0 | v0.38.2 | v0.58.1 - <= v0.59.0 | >= v1.27.3 | >= v1.27.3 | v3.14.2 | >= v0.27.4 | Memory >= 12GB, CPU cores >= 6 | 2025-01-13 | 2025-02-13 |
| 0.32.0 | >= 20.18.0 (lts/iron) | >= v0.26.0 | v0.38.2 | v0.58.1 - <= v0.59.0 | >= v1.27.3 | >= v1.27.3 | v3.14.2 | >= v0.27.4 | Memory >= 12GB, CPU cores >= 6 | 2024-12-31 | 2025-01-31 |
| 0.31.4 | >= 20.18.0 (lts/iron) | >= v0.26.0 | v0.31.4 | v0.54.0 – <= v0.57.0 | >= v1.27.3 | >= v1.27.3 | v3.14.2 | >= v0.27.4 | Memory >= 12GB, CPU cores >= 6 | 2024-10-23 | 2024-11-23 |
| 0.30.0 | >= 20.14.0 (lts/Iron) | >= v0.26.0 | v0.30.0 | v0.54.0 – <= v0.57.0 | >= v1.27.3 | >= v1.27.3 | v3.14.2 | >= v0.27.4 | Memory >= 12GB, CPU cores >= 6 | 2024-09-17 | 2024-10-17 |
| 0.29.0 | >= 20.14.0 (lts/Iron) | >= v0.26.0 | v0.30.0 | v0.53.0 – <= v0.57.0 | >= v1.27.3 | >= v1.27.3 | v3.14.2 | >= v0.27.4 | Memory >= 12GB, CPU cores >= 6 | 2024-09-06 | 2024-10-06 |
Legacy Releases
| Solo Version | Node.js | Kind | Solo Chart | Hedera | Kubernetes | Kubectl | Helm | k9s | Docker Resources | Release Date | End of Support |
|---|---|---|---|---|---|---|---|---|---|---|---|
| 0.51.0 | >= 22.0.0 (lts/jod) | >= v0.26.0 | v0.58.1 | v0.66.0+ | >= v1.27.3 | >= v1.27.3 | v3.14.2 | >= v0.27.4 | Memory >= 12GB, CPU cores >= 6 | 2025-12-05 | 2026-01-05 |
| 0.49.0 | >= 22.0.0 (lts/jod) | >= v0.26.0 | v0.57.0 | v0.66.0+ | >= v1.27.3 | >= v1.27.3 | v3.14.2 | >= v0.27.4 | Memory >= 12GB, CPU cores >= 6 | 2025-11-06 | 2025-12-06 |
| 0.48.0 (LTS) | >= 22.0.0 (lts/jod) | >= v0.26.0 | v0.56.0 | v0.66.0+ | >= v1.27.3 | >= v1.27.3 | v3.14.2 | >= v0.27.4 | Memory >= 12GB, CPU cores >= 6 | 2025-10-24 | 2026-01-24 |
| 0.47.0 | >= 22.0.0 (lts/jod) | >= v0.26.0 | v0.56.0 | v0.66.0+ | >= v1.27.3 | >= v1.27.3 | v3.14.2 | >= v0.27.4 | Memory >= 12GB, CPU cores >= 6 | 2025-10-16 | 2025-11-16 |
| 0.46.0 (LTS) | >= 22.0.0 (lts/jod) | >= v0.26.0 | v0.56.0 | v0.65.1+ | >= v1.27.3 | >= v1.27.3 | v3.14.2 | >= v0.27.4 | Memory >= 12GB, CPU cores >= 6 | 2025-10-02 | 2026-01-02 |
| 0.45.0 | >= 22.0.0 (lts/jod) | >= v0.26.0 | v0.56.0 | v0.65.1+ | >= v1.27.3 | >= v1.27.3 | v3.14.2 | >= v0.27.4 | Memory >= 12GB, CPU cores >= 6 | 2025-09-24 | 2025-10-24 |
| 0.44.0 (LTS) | >= 22.0.0 (lts/jod) | >= v0.26.0 | v0.56.0 | v0.64.2+ | >= v1.27.3 | >= v1.27.3 | v3.14.2 | >= v0.27.4 | Memory >= 12GB, CPU cores >= 6 | 2025-09-16 | 2025-12-16 |
| 0.43.0 | >= 20.19.0 (lts/iron) | >= v0.26.0 | v0.54.5 | v0.63.9+ | >= v1.27.3 | >= v1.27.3 | v3.14.2 | >= v0.27.4 | Memory >= 12GB, CPU cores >= 6 | 2025-08-15 | 2025-09-15 |
| 0.42.0 (LTS) | >= 20.19.0 (lts/iron) | >= v0.26.0 | v0.54.5 | v0.63.9+ | >= v1.27.3 | >= v1.27.3 | v3.14.2 | >= v0.27.4 | Memory >= 12GB, CPU cores >= 6 | 2025-08-11 | 2025-11-11 |
| 0.41.0 | >= 20.19.0 (lts/iron) | >= v0.26.0 | v0.54.4 | v0.62.10+ | >= v1.27.3 | >= v1.27.3 | v3.14.2 | >= v0.27.4 | Memory >= 12GB, CPU cores >= 6 | 2025-07-24 | 2025-08-24 |
| 0.40.1 | >= 20.19.0 (lts/iron) | >= v0.26.0 | v0.54.4 | v0.61.7+ | >= v1.27.3 | >= v1.27.3 | v3.14.2 | >= v0.27.4 | Memory >= 12GB, CPU cores >= 6 | 2025-07-17 | 2025-08-17 |
| 0.40.0 | >= 20.19.0 (lts/iron) | >= v0.26.0 | v0.54.4 | v0.61.7+ | >= v1.27.3 | >= v1.27.3 | v3.14.2 | >= v0.27.4 | Memory >= 12GB, CPU cores >= 6 | 2025-07-16 | 2025-08-16 |
| 0.39.0 | >= 20.19.0 (lts/iron) | >= v0.26.0 | v0.54.3 | v0.61.7+ | >= v1.27.3 | >= v1.27.3 | v3.14.2 | >= v0.27.4 | Memory >= 12GB, CPU cores >= 6 | 2025-07-03 | 2025-08-03 |
| 0.38.0 | >= 20.19.0 (lts/iron) | >= v0.26.0 | v0.54.3 | v0.58.1+ | >= v1.27.3 | >= v1.27.3 | v3.14.2 | >= v0.27.4 | Memory >= 12GB, CPU cores >= 6 | 2025-06-26 | 2025-07-26 |
| 0.37.1 | >= 20.19.0 (lts/iron) | >= v0.26.0 | v0.53.0 | v0.58.1+ | >= v1.27.3 | >= v1.27.3 | v3.14.2 | >= v0.27.4 | Memory >= 12GB, CPU cores >= 6 | 2025-06-03 | 2025-07-03 |
| 0.37.0 | >= 20.19.0 (lts/iron) | >= v0.26.0 | v0.53.0 | v0.58.1+ | >= v1.27.3 | >= v1.27.3 | v3.14.2 | >= v0.27.4 | Memory >= 12GB, CPU cores >= 6 | 2025-06-02 | 2025-07-02 |
| 0.36.1 | >= 20.18.0 (lts/iron) | >= v0.26.0 | v0.53.0 | v0.58.1+ | >= v1.27.3 | >= v1.27.3 | v3.14.2 | >= v0.27.4 | Memory >= 12GB, CPU cores >= 6 | 2025-05-28 | 2025-06-28 |
| 0.36.0 | >= 20.18.0 (lts/iron) | >= v0.26.0 | v0.52.0 | v0.58.1+ | >= v1.27.3 | >= v1.27.3 | v3.14.2 | >= v0.27.4 | Memory >= 12GB, CPU cores >= 6 | 2025-05-23 | 2025-06-23 |
| 0.35.0 | >= 20.18.0 (lts/iron) | >= v0.26.0 | v0.44.0 | v0.58.1+ | >= v1.27.3 | >= v1.27.3 | v3.14.2 | >= v0.27.4 | Memory >= 12GB, CPU cores >= 6 | 2025-02-20 | 2025-03-20 |
| 0.34.0 | >= 20.18.0 (lts/iron) | >= v0.26.0 | v0.42.10 | v0.58.1+ | >= v1.27.3 | >= v1.27.3 | v3.14.2 | >= v0.27.4 | Memory >= 12GB, CPU cores >= 6 | 2025-01-24 | 2025-02-24 |
| 0.33.0 | >= 20.18.0 (lts/iron) | >= v0.26.0 | v0.38.2 | v0.58.1 - <= v0.59.0 | >= v1.27.3 | >= v1.27.3 | v3.14.2 | >= v0.27.4 | Memory >= 12GB, CPU cores >= 6 | 2025-01-13 | 2025-02-13 |
| 0.32.0 | >= 20.18.0 (lts/iron) | >= v0.26.0 | v0.38.2 | v0.58.1 - <= v0.59.0 | >= v1.27.3 | >= v1.27.3 | v3.14.2 | >= v0.27.4 | Memory >= 12GB, CPU cores >= 6 | 2024-12-31 | 2025-01-31 |
| 0.31.4 | >= 20.18.0 (lts/iron) | >= v0.26.0 | v0.31.4 | v0.54.0 – <= v0.57.0 | >= v1.27.3 | >= v1.27.3 | v3.14.2 | >= v0.27.4 | Memory >= 12GB, CPU cores >= 6 | 2024-10-23 | 2024-11-23 |
| 0.30.0 | >= 20.14.0 (lts/Iron) | >= v0.26.0 | v0.30.0 | v0.54.0 – <= v0.57.0 | >= v1.27.3 | >= v1.27.3 | v3.14.2 | >= v0.27.4 | Memory >= 12GB, CPU cores >= 6 | 2024-09-17 | 2024-10-17 |
| 0.29.0 | >= 20.14.0 (lts/Iron) | >= v0.26.0 | v0.30.0 | v0.53.0 – <= v0.57.0 | >= v1.27.3 | >= v1.27.3 | v3.14.2 | >= v0.27.4 | Memory >= 12GB, CPU cores >= 6 | 2024-09-06 | 2024-10-06 |